Announcement

Collapse
No announcement yet.

I just can't help myself...another pit build

Collapse
X
 
  • Filter
  • Time
  • Show
Clear All
new posts

    I just can't help myself...another pit build

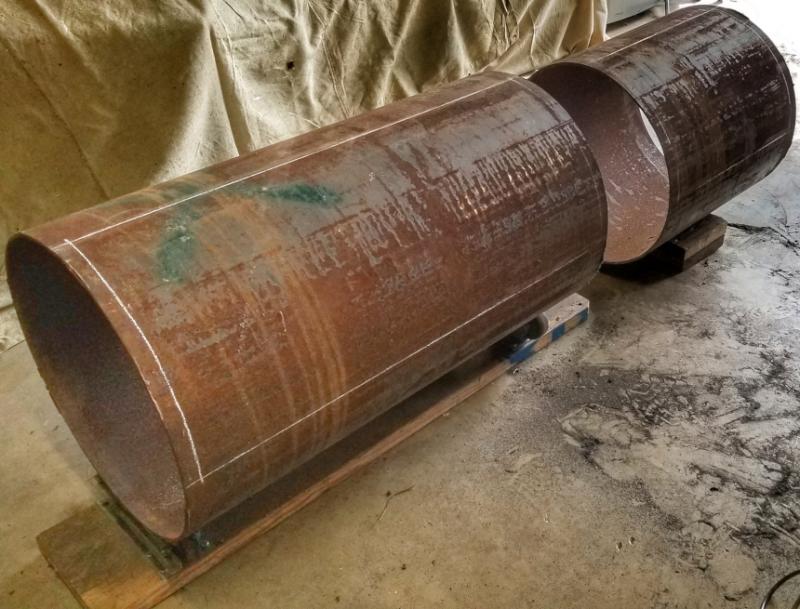
    A buddy of mine had intended to use this pipe section for a pit build but after 2 1/2 years of sitting he finally just gave it to me

    Fast forward about a month and here she is, all ready for paint and first seasoning. Sometimes I just can't help myself...I love doing these pit builds

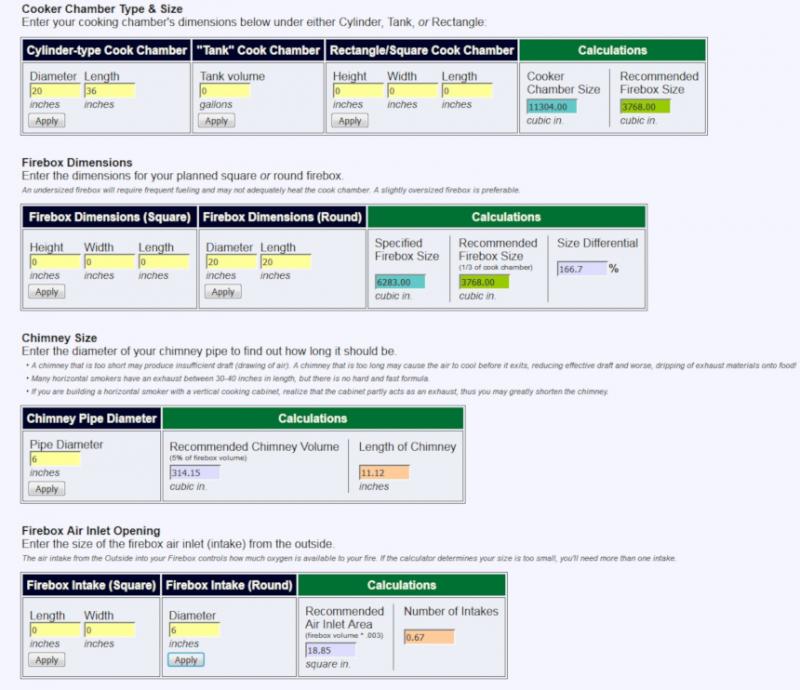
    Here's the raw pipe section I inherited. 20" diameter, 56" long, 1/4" wall. Main smoke chamber will be 20"x36" and firebox will be 20"x20" square. I used Feldon's online calculator to (over)size everything:

    Click image for larger version

Name:	1.jpg
Views:	1
Size:	62.8 KB
ID:	25165025

    Click image for larger version

Name:	feldon.jpg
Views:	1
Size:	70.1 KB
ID:	25165039

    Got the single door, firebox & firebox door all marked off

    Click image for larger version

Name:	2.jpg
Views:	1
Size:	62.3 KB
ID:	25165026

    Time to start making a mess!

    Click image for larger version

Name:	3.jpg
Views:	1
Size:	75.9 KB
ID:	25165027

    Quick trip to the steel supply place for all my flat plate, angle, flat bar, etc. Got my rounds cut

    Click image for larger version

Name:	4.jpg
Views:	1
Size:	43.5 KB
ID:	25165028

    Putting that engineering degree to work! Feldon's calculator said I needed a 50 sq inch opening between chamber & firebox.

    Click image for larger version

Name:	5.jpg
Views:	1
Size:	52.3 KB
ID:	25165029

    Doors skirted

    Click image for larger version

Name:	6.jpg
Views:	1
Size:	59.5 KB
ID:	25165030

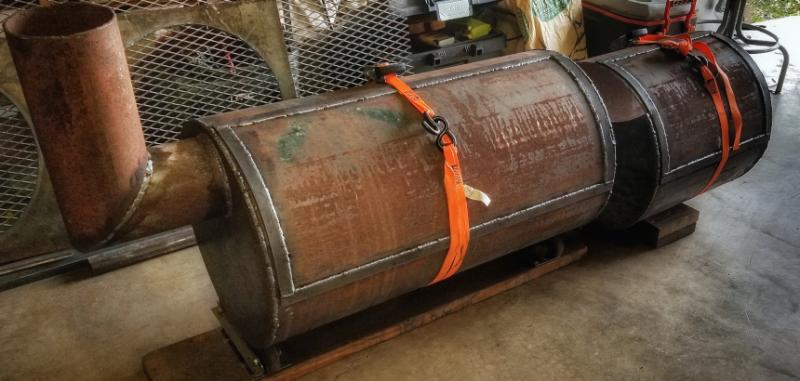
    Chimney was an old piece of 6" pipe I had laying around and did the job nicely. Got it mounted and the doors are set ready for hinges.

    Click image for larger version

Name:	7.jpg
Views:	1
Size:	50.1 KB
ID:	25165031

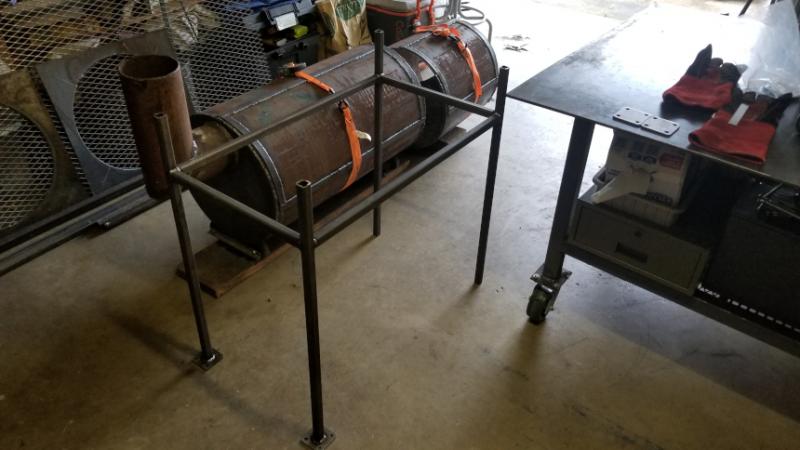
    Built the stand b/c I got tired of working on the ground

    Click image for larger version

Name:	8.jpg
Views:	1
Size:	46.5 KB
ID:	25165032

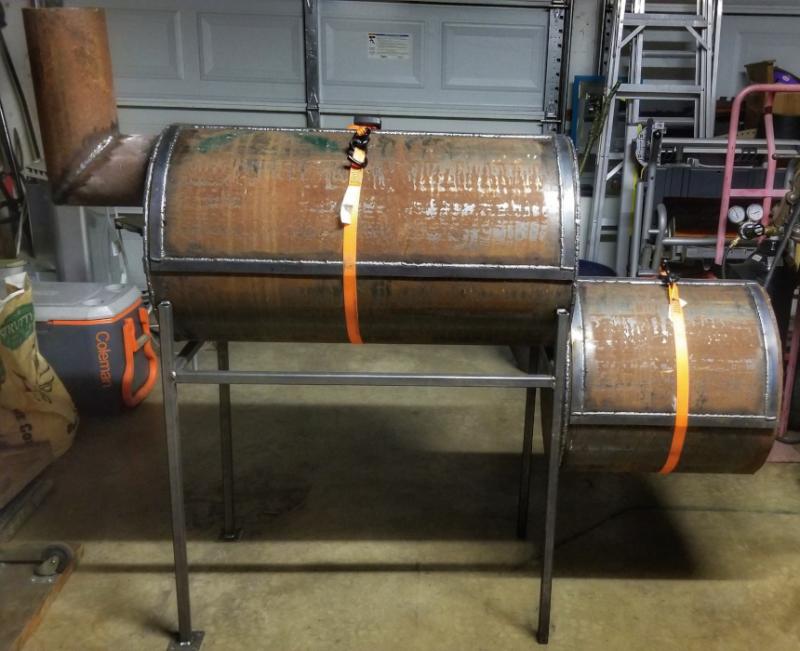
    Pit mounted on the stand!

    Click image for larger version

Name:	9.jpg
Views:	1
Size:	65.5 KB
ID:	25165033

    Just another weekend in the man cave. It isn't huge but it's enough space for me to work Got most of the shelving & cooking grates done at this point.

    Click image for larger version

Name:	10.jpg
Views:	1
Size:	65.9 KB
ID:	25165034

    Firebox door, draft door & handle mounted. I was particularly proud of how the handle turned out...just kind of made it up on the fly.

    Click image for larger version

Name:	11.jpg
Views:	1
Size:	46.7 KB
ID:	25165035

    Opens & closes like a dream

    Click image for larger version

Name:	12.jpg
Views:	1
Size:	42.4 KB
ID:	25165036

    Handles, hinges, temp gauge, chimney flu and wheels put on. All the handles were cheap $5 chipping hammers I bought at the metal supply place...I just cut the heads off and they make great BBQ pit handles...already welded & painted

    Click image for larger version

Name:	13.jpg
Views:	1
Size:	80.5 KB
ID:	25165037

    BAM! Ready for paint & first seasoning. I still need to make a cooking grate for the firebox but that will come later.

    Click image for larger version

Name:	14.jpg
Views:	1
Size:	87.4 KB
ID:	25165038

    All-in-all I have about $350 into this pit in materials. I've seen similar pits go for $1500-$2k. Not too shabby considering I spent mostly evenings and 1 weekend working on it.
    Last edited by JonBoy; 12-06-2018, 09:03 AM.

    #2
    Very nice!!!

    Comment


      #3
      Fine, fine work, sir. I am jealous.

      How much does she weigh? That is a professional pit, in my eyes.

      Comment


        #4
        Looks really good.
        Wish I had your metal skills

        Comment


          #5
          Now THERE's something I wish I could build!! Very nice!!

          Comment


            #6
            Originally posted by hog_down View Post
            Fine, fine work, sir. I am jealous.

            How much does she weigh? That is a professional pit, in my eyes.
            Thanks! She's in the neighborhood of 350-400 lbs. The pipe section alone was 250 lbs and then add the steel plate, shelve, frame, etc. Took me and another guy to hoist her up onto the stand.

            Comment


              #7
              Originally posted by Dillakilla View Post
              Looks really good.
              Wish I had your metal skills
              Just YouTube & a lot of practice. I really helped myself when I bought a proper Mig machine...it makes my average skill look much better than it is

              Comment


                #8
                very nice!

                Comment


                  #9
                  nice pit!

                  Comment


                    #10
                    ****it, man! Love it. Thanks for taking the time to post

                    Comment


                      #11
                      What size angle iron around the expanded metal for the shelves and what are the metal straps under the doors for?

                      I like the double rack for smaller items on top. Very good job!

                      Comment


                        #12
                        Originally posted by Killer View Post
                        What size angle iron around the expanded metal for the shelves and what are the metal straps under the doors for?

                        I like the double rack for smaller items on top. Very good job!
                        Angle iron is 1" x 1/8" thick. Square tube was 1" square x 3/16" thick (I wanted it more structural). I forget the nomenclature for the expanded metal (#8 comes to mind?) but I just ask for sheets of it for BBQ pits and they know what I'm talking about. They were out of small 1/4" thick flat plate so I settled on 3/16"...shouldn't matter considering they're just end caps...this thing will never rust out

                        The flat straps on the back of the doors are to keep them from springing when I part them off. I cut the doors out except the 4 corners and then I weld straps onto the back of them and when I finish parting them off they stay their same shape. Sometimes pipe can have residual stresses in them and when you part sections off they'll warp on you if you don't do this.
                        Last edited by JonBoy; 12-06-2018, 09:38 AM.

                        Comment


                          #13
                          Nice work. The expanded metal is 3/4 #9 flat.

                          Those hinges are gonna bind up on you over time though. Pit hinges need some wiggle room for rust to buildup. That is why so many use 1/2" rod, & pipe.

                          Comment


                            #14
                            Great job, that's awesome.

                            Comment


                              #15
                              Originally posted by Palmetto View Post
                              Nice work. The expanded metal is 3/4 #9 flat.

                              Those hinges are gonna bind up on you over time though. Pit hinges need some wiggle room for rust to buildup. That is why so many use 1/2" rod, & pipe.
                              Yeah I didn't think about that on this build. I guess I'll just periodically try to keep em oiled. They have a little grease in them now. I used bullet hinges for the firebox door and they have a fitting to grease them but that was after I put the other door hinges on. Thanks for the info on the expanded metal
                              Last edited by JonBoy; 12-07-2018, 09:00 AM.

                              Comment

                              Working...
                              X