Are you at your Wits_End with electricity prices? I am. My 3 year 8.3c plan expired and the cheapest I could find on powertochoose was 15c with 60month plans, no thanks. Maybe the prices will come back down, but right now I am stuck with extremely high rates or long term high rates. Upon renewing I checked with my provider and thought I struck gold when I found an 11.5c rate (luck is all I can figure). In either case, the solar investment seemed to become reasonable.
For the longest time I couldn't get the math to work out. With reasonable estimations, a federal tax credit, and complete DIY system I was looking at 7 year return on investment. To me that is way to much risk for potentially getting my money back in 7 years and then trying to keep equipment up and running to actually make some money. The equipment warranties didn't support this.
Two recent events pushed me over the edge, high electricity prices and the discovery of lightly used solar panels for less than half price. Both brought the ROI to about 3 years.
I've done the math, gone through the approval process, have installed the system and it has been operating for about 2 weeks. The power I am getting is dead on with my estimations.
To me this is a trial effort to understand the system, understand true efficiencies, and calculate true ROI for my system. What this is not is an attempt to go off grid or have power when grid goes down, I have a generator for that. My long term plans is to add an equipment shed to the property and line it's roof, tripling the system size and basically providing all of the power I need.
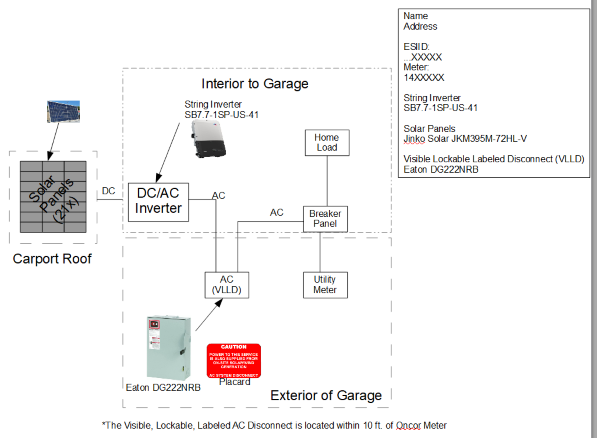
Oncor agreement to operate - I thought this was going to be a major PITA so after I had a good idea of the system, I started with this process. If they wanted something changed or denied it or it took more time than my patience could handle I didn't want to have the money tied up in equipment sitting in the garage. I will say this was the easiest and most straightforward process I have ever dealt with in this type of job. From start to finish was about 3 days. I did read every detail and made sure my documents were exactly as asked for. These were the two documents with exact verbiage asked for. The information box was not requested, but I figured it wouldn't hurt.

After approval, I proceeded to purchase all of the equipment, which all arrived within a week.
Hardware:
Solar panels (21x) (no warranty) - Jinko 395W - $175/each - $3,675 (used, about 1-2 years old)
Grid Tied Inverter (10yr warranty) - SMA Sunnyboy 7.7US - $1758 shipped
thepowerstore.com is located locally and shipped extremely fast, even though the website said 4 week delay
Wire for DC side - Temco 10awg solar wire - $233
Connectors - DC Side - $25
AC cutoff box Eaton DG222NRB - $152
Steel (cpurlin, receiver, 2x2 thick walled, angle) - $750
Conduit - $75
Total - ~$6700
Solar Panels - Installed 21 total, 3 rows of 7 panels which is about the max I could install with still having walkable room to service them.

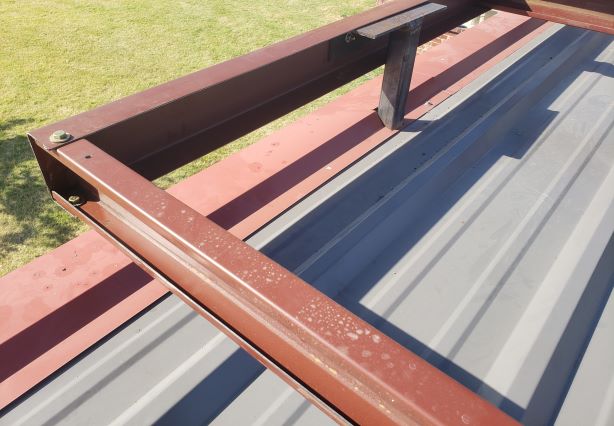
Install - Carport roof - I would never install on my house roof. I fight enough water issues and one simple missed leak would kill the savings I could achieve in a lifetime. I have a mueller 24x24 carport that I installed a few years ago. I decided to build a frame over the top of the carport and basically add another roof made of solar panels. This could be any roof, shed, shop, barn, etc. IronRidge makes awesome adapters to mount rails to Rpanel roofs, and their rail system is easy peasy. I did not go this route as it was going to cost a bit more and required more planning.
All Cpurlin and receivers were precut, predrilled, and ready to be bolted together. I did all of this under the carport's shade. Solar panels were installed with bolts and fender washers, basically sandwiches them down.


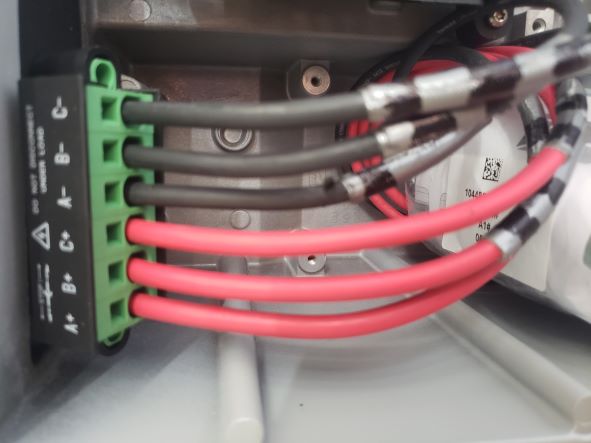
Wiring - Each row was wired into a series of panels so Row A, Row B, Row C,
the results was 6 total wires (3pos, 3neg) ran into the garage to the inverter, which allows up to three DC circuits. The 10/3 AC side wires were run through the attic and down the wall and then penetrated through the wall to the outside where the Eaton shutoff was located, near the grid power meter. It then came right back in and into the breaker panel.


Power
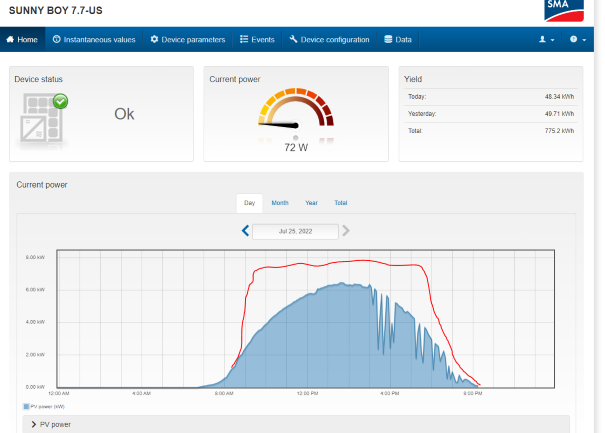
21 panels at 395w is about 8,300watts DC, due to inefficiencies, heat, mounting, etc my system is maxing out about 6,500watts midday.
Average is about 49kwh per day. So in July a total of about 1,400kwh, with mostly sunshine days.
Max the inverter input is 12,500w of solar power or about 31 panels, but max inverter output is around 7,700watts AC. Any extra power you generate over 7,700 is wasted, but the more panels you have the sooner you get to that max and the longer you stay at that max, therefore increasing power generated. You can roughly see this in the red line I drew on the chart. I'd like to add 15ft to my carport for another vehicle to park which would allow me to add more panels to the existing rows. I would do better to install about 3 more panels per row.
The following is the spreadsheet I created during my initial estimation efforts. At 8.3c it was not worth it, but at 11c+ it makes more sense. It shows my average usage per month over the last few years. With efficiencies added in I was predicting about 1,300w in July, I think I will be very close to that. Winter months output will drop off due to less sunlight.
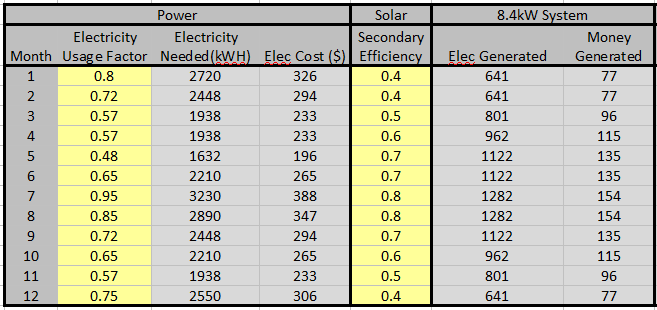
I am estimating to generate about 40% of the total power I use.
All in all it took $6,700 and about 12 hours to build and install, not counting running around time to get metal or panels. Based on total cost and fed tax credit, 11c/kwh I am looking to recoup my cost in about 3 years, at 16c it would be 2 years. Even if I am off a year, it still seems like a reasonable investment. The inverter has a 10 year warranty and the panels should last 25years, who knows.
I don't plan to get rich off of the savings and for most people it is simply not worth it. It wouldn't even be a consideration if I had to pay someone or if I had to mount it on my roof. Time will tell.
For the longest time I couldn't get the math to work out. With reasonable estimations, a federal tax credit, and complete DIY system I was looking at 7 year return on investment. To me that is way to much risk for potentially getting my money back in 7 years and then trying to keep equipment up and running to actually make some money. The equipment warranties didn't support this.
Two recent events pushed me over the edge, high electricity prices and the discovery of lightly used solar panels for less than half price. Both brought the ROI to about 3 years.
I've done the math, gone through the approval process, have installed the system and it has been operating for about 2 weeks. The power I am getting is dead on with my estimations.
To me this is a trial effort to understand the system, understand true efficiencies, and calculate true ROI for my system. What this is not is an attempt to go off grid or have power when grid goes down, I have a generator for that. My long term plans is to add an equipment shed to the property and line it's roof, tripling the system size and basically providing all of the power I need.
Oncor agreement to operate - I thought this was going to be a major PITA so after I had a good idea of the system, I started with this process. If they wanted something changed or denied it or it took more time than my patience could handle I didn't want to have the money tied up in equipment sitting in the garage. I will say this was the easiest and most straightforward process I have ever dealt with in this type of job. From start to finish was about 3 days. I did read every detail and made sure my documents were exactly as asked for. These were the two documents with exact verbiage asked for. The information box was not requested, but I figured it wouldn't hurt.
After approval, I proceeded to purchase all of the equipment, which all arrived within a week.
Hardware:
Solar panels (21x) (no warranty) - Jinko 395W - $175/each - $3,675 (used, about 1-2 years old)
Grid Tied Inverter (10yr warranty) - SMA Sunnyboy 7.7US - $1758 shipped
thepowerstore.com is located locally and shipped extremely fast, even though the website said 4 week delay
Wire for DC side - Temco 10awg solar wire - $233
Connectors - DC Side - $25
AC cutoff box Eaton DG222NRB - $152
Steel (cpurlin, receiver, 2x2 thick walled, angle) - $750
Conduit - $75
Total - ~$6700
Solar Panels - Installed 21 total, 3 rows of 7 panels which is about the max I could install with still having walkable room to service them.
Install - Carport roof - I would never install on my house roof. I fight enough water issues and one simple missed leak would kill the savings I could achieve in a lifetime. I have a mueller 24x24 carport that I installed a few years ago. I decided to build a frame over the top of the carport and basically add another roof made of solar panels. This could be any roof, shed, shop, barn, etc. IronRidge makes awesome adapters to mount rails to Rpanel roofs, and their rail system is easy peasy. I did not go this route as it was going to cost a bit more and required more planning.
All Cpurlin and receivers were precut, predrilled, and ready to be bolted together. I did all of this under the carport's shade. Solar panels were installed with bolts and fender washers, basically sandwiches them down.
Wiring - Each row was wired into a series of panels so Row A, Row B, Row C,
the results was 6 total wires (3pos, 3neg) ran into the garage to the inverter, which allows up to three DC circuits. The 10/3 AC side wires were run through the attic and down the wall and then penetrated through the wall to the outside where the Eaton shutoff was located, near the grid power meter. It then came right back in and into the breaker panel.
Power
21 panels at 395w is about 8,300watts DC, due to inefficiencies, heat, mounting, etc my system is maxing out about 6,500watts midday.
Average is about 49kwh per day. So in July a total of about 1,400kwh, with mostly sunshine days.
Max the inverter input is 12,500w of solar power or about 31 panels, but max inverter output is around 7,700watts AC. Any extra power you generate over 7,700 is wasted, but the more panels you have the sooner you get to that max and the longer you stay at that max, therefore increasing power generated. You can roughly see this in the red line I drew on the chart. I'd like to add 15ft to my carport for another vehicle to park which would allow me to add more panels to the existing rows. I would do better to install about 3 more panels per row.
The following is the spreadsheet I created during my initial estimation efforts. At 8.3c it was not worth it, but at 11c+ it makes more sense. It shows my average usage per month over the last few years. With efficiencies added in I was predicting about 1,300w in July, I think I will be very close to that. Winter months output will drop off due to less sunlight.
I am estimating to generate about 40% of the total power I use.
All in all it took $6,700 and about 12 hours to build and install, not counting running around time to get metal or panels. Based on total cost and fed tax credit, 11c/kwh I am looking to recoup my cost in about 3 years, at 16c it would be 2 years. Even if I am off a year, it still seems like a reasonable investment. The inverter has a 10 year warranty and the panels should last 25years, who knows.
I don't plan to get rich off of the savings and for most people it is simply not worth it. It wouldn't even be a consideration if I had to pay someone or if I had to mount it on my roof. Time will tell.


Comment