
New to the Krivoman blind world and decided after hunting in an elevated stand, I wanted to go up a little from my normal 6x6 boxes one concrete block off the ground with this one. The original thought was to have a second blind on this 35x65 yard pen for better wind choices each weekend but it morphed into a "better for the dominant SW wind and still keep it in the shade" blind.. Truth be told its not much further away from my 6x6 but it is much better for the SW wind with my deer at the feeder. Everybody I talked to emphasized shade in these hot boxes, so I listened. They way it is set up in the pen, its going to be hard to talk myself into hunting out of my 6x6 box again unless its a north wind. Speaking of north winds......Friday was 22 and a high of 38 and Sat am was 12 with a windchill of 7...
 I'm paying for it now sick as a dog.
So after a few months of research and asking several TBHers on the platform threads a lot of questions behind the scenes,I decided on a 7' x 10' platform and 6' tall... 10' long because the Krivo is 82" long and I figured a 3' porch would be plenty of room for this big old boy to get in and out of the door safely.. I also had a 24" x 8' piece of 3/4" plywood left over from a previous build so no added expense there for the extension plywood wise. I went 7' wide because, besides my porch, I wanted the least amount of plywood top showing. I didn't min the extra cuts either to get it to 7. As you can see, I had plenty of uses for the shorter boards in bulking up the overbuilt platform deck any way. When I bought my Krivo used, it came with a 8x8x2' platform that was pretty warped but I was able to salvage the two 4x8 pieces of plywood and several of the treated 2x4s for railing and step support bracing. We made use of what we could and took the rest to the dump. The rest of the blind is new treated wood and at today's prices, I felt like I was building with gold bars.. Was thankful I didn't have to buy plywood for it at $70/sheet. Painted the plywood and will paint the rest of the platform after the drying period. I realized my age after a buddy of mine and I had to struggle to get the second set of legs in the brackets at 6'. The first two were easy but lifting the whole platform up over or 5'9-5'10 heads while trying to fit 6' 4x4s in a bracket was a challenge. That freshly treated wood is heavy! Lets just say my clean and jerk is not what it used to be.
 We definitely need another set of hands.. If I do this for my other pen, I will definitely be buying a pre-made metal platform or paying somebody to build a custom. I'm too old for this crap...lol I am, however, extremely happy with the way it turned out. Next project is the flooring and deluxe windows ...
Anyway...on to the pics...
The platform that came with it we salvaged from.

Started the build with the basic framing back home. Was too large to haul 5 hours on a trailer fully assembled so I put what i could together and pretty much cut what I could to make assembly easier in the woods.


And yes i overbuilt....see big ol boy mentioned above..

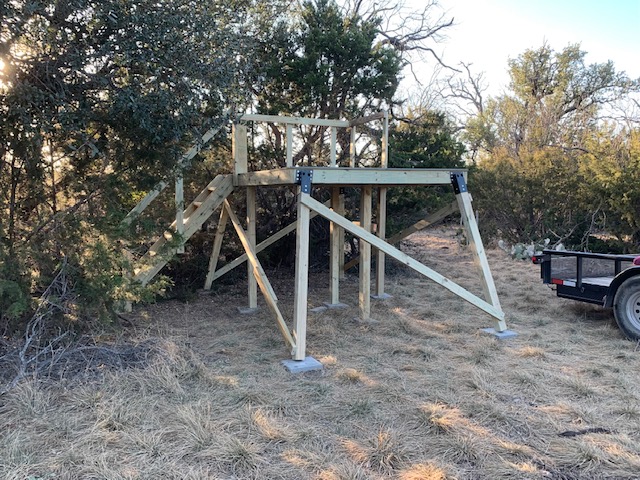
Was good to get it in the air here. we took a solid break after this. Again one more set of hands would have made it easier.


I went with stairs instead of a ladder. Might as well be easy access from the start .


The finished product to date. Still have several things to do to it, but this is where we got to, given our allotted time and we still had to refresh some brush in some of the turkey blinds in our strutting fields....

The view. That mesquite and cedar tree will be topped next trip as well...

Truth be told its not much further away from my 6x6 but it is much better for the SW wind with my deer at the feeder. Everybody I talked to emphasized shade in these hot boxes, so I listened. They way it is set up in the pen, its going to be hard to talk myself into hunting out of my 6x6 box again unless its a north wind. Speaking of north winds......Friday was 22 and a high of 38 and Sat am was 12 with a windchill of 7... I'm paying for it now sick as a dog.So after a few months of research and asking several TBHers on the platform threads a lot of questions behind the scenes,I decided on a 7' x 10' platform and 6' tall... 10' long because the Krivo is 82" long and I figured a 3' porch would be plenty of room for this big old boy to get in and out of the door safely..
I also had a 24" x 8' piece of 3/4" plywood left over from a previous build so no added expense there for the extension plywood wise. I went 7' wide because, besides my porch, I wanted the least amount of plywood top showing. I didn't min the extra cuts either to get it to 7. As you can see, I had plenty of uses for the shorter boards in bulking up the overbuilt platform deck any way. When I bought my Krivo used, it came with a 8x8x2' platform that was pretty warped but I was able to salvage the two 4x8 pieces of plywood and several of the treated 2x4s for railing and step support bracing. We made use of what we could and took the rest to the dump. The rest of the blind is new treated wood and at today's prices, I felt like I was building with gold bars.. Was thankful I didn't have to buy plywood for it at $70/sheet. Painted the plywood and will paint the rest of the platform after the drying period. I realized my age after a buddy of mine and I had to struggle to get the second set of legs in the brackets at 6'. The first two were easy but lifting the whole platform up over or 5'9-5'10 heads while trying to fit 6' 4x4s in a bracket was a challenge. That freshly treated wood is heavy! Lets just say my clean and jerk is not what it used to be. We definitely need another set of hands.. If I do this for my other pen, I will definitely be buying a pre-made metal platform or paying somebody to build a custom. I'm too old for this crap...lol I am, however, extremely happy with the way it turned out. Next project is the flooring and deluxe windows ...Anyway...on to the pics...
The platform that came with it we salvaged from.
Started the build with the basic framing back home. Was too large to haul 5 hours on a trailer fully assembled so I put what i could together and pretty much cut what I could to make assembly easier in the woods.
And yes i overbuilt....see big ol boy mentioned above..
Was good to get it in the air here. we took a solid break after this.
Again one more set of hands would have made it easier.I went with stairs instead of a ladder. Might as well be easy access from the start .
The finished product to date. Still have several things to do to it, but this is where we got to, given our allotted time and we still had to refresh some brush in some of the turkey blinds in our strutting fields....
The view. That mesquite and cedar tree will be topped next trip as well...
Comment