Announcement

Collapse
No announcement yet.

Acrylic Fish Tank Build

Collapse
X
 
  • Filter
  • Time
  • Show
Clear All
new posts

    Acrylic Fish Tank Build

    I was inspired by a YouTube video to build my own acrylic fish tank. I liked the idea of building a multi-chambered tank that I could adjust individual water parameters on. I called around to a few acrylic sheet dealers and was able to pick up the cuts I needed for around $160.
    I purchased the following sheets in 3/8", clear, cell cast acrylic:
    3 - 48"x12"
    5 - 12"x11 1/4"

    I also ordered an acrylic edge scraper, a pint of Weld-On 4, and two half ounce applicators for $54 with shipping.

    My buddy Zach came over one evening and helped me get everything ready and together. I didn't document every step, but I got a few photos along the way.

    After we got all the edges scraped and free of saw marks, we peeled back the protective paper from the edges of the acrylic.

    We squared everything off clamped our sheets down (just enough to keep stuff from moving) and began the process of welding. Acrylic is not like glass, and silicone cannot be used. You have to use a chemical "welding" process to melt the sheets to one another.

    We welded the front sheet to the bottom, both sides, the interior dividers, and finally the back panel.

    Click image for larger version

Name:	Screenshot_20190720-202700.jpg
Views:	1
Size:	30.1 KB
ID:	25182842
    Click image for larger version

Name:	Screenshot_20190720-202719.jpg
Views:	1
Size:	32.2 KB
ID:	25182843

    After we had everything welded, I went to a wedding for a couple days while the tank cured.
    When I returned, I went through the painstaking process of polishing the acrylic where I got a little sloppy with the welding.
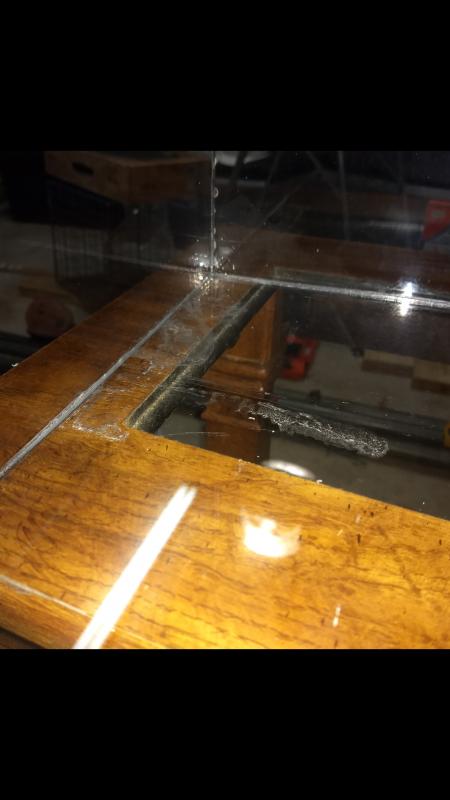
    Click image for larger version

Name:	Screenshot_20190720-202823.jpg
Views:	1
Size:	31.7 KB
ID:	25182848
    Click image for larger version

Name:	Screenshot_20190720-202843.jpg
Views:	1
Size:	33.5 KB
ID:	25182849
    Click image for larger version

Name:	Screenshot_20190720-202855.jpg
Views:	1
Size:	35.1 KB
ID:	25182850

    Luckily, if you take your time acrylic polishes up pretty clear, and I had a finished tank. After I finished up the polishing we had a party at the house and I had to wrap up my work for the day.

    The following day I tested the tank for leaks, cleaned it off and moved it upstairs. The base is a table I got on Craigslist for $40.

    Click image for larger version

Name:	Screenshot_20190720-202910.jpg
Views:	1
Size:	37.4 KB
ID:	25182851

    That concludes Part 1. Part 2 (which I will post tomorrow) will be substrates, stone, wood, plants, filters, lighting, fish, and the finished tank.

    Thanks for tuning in!

    #2
    I used to own an aquarium store and I would also build my own custom sumps and tanks. My suggestion to you is to not use as much as you think you need. The trick is to not place the clamps on until you place a little of the solution into the joint, run a slight amount the entire length and then clamp the tank. The rest of the solution will then run into all of the other areas that you may have missed.

    Once this is done you can then go over all exposed edges with a torch and it will make all of your corners clear as the rest of the acrylic. But for your first time that looks good.

    I would suggest that you inspect the seems closely to make sure that you have a good seal without or should I say a minimal amount of pockets in which there isn’t a weld.

    Unless I missed it I don’t see any form of a hole for your sump, unless you are going to use a canister filter.

    Comment


      #3
      Originally posted by alwaysinshorts View Post
      I used to own an aquarium store and I would also build my own custom sumps and tanks. My suggestion to you is to not use as much as you think you need. The trick is to not place the clamps on until you place a little of the solution into the joint, run a slight amount the entire length and then clamp the tank. The rest of the solution will then run into all of the other areas that you may have missed.

      Once this is done you can then go over all exposed edges with a torch and it will make all of your corners clear as the rest of the acrylic. But for your first time that looks good.

      I would suggest that you inspect the seems closely to make sure that you have a good seal without or should I say a minimal amount of pockets in which there isn’t a weld.

      Unless I missed it I don’t see any form of a hole for your sump, unless you are going to use a canister filter.
      All good advice. I definitely learned alot the first time around. You didn't miss anything: there is no sump. You'll get to see the filters in part 2, coming soon .

      Comment


        #4
        Well, I got a wild hair and decided to finish up this write up tonight.

        Part 2:
        I got the tank and stand upstairs in the game room (which was a 1 man job), and began the aquascape, filtration, etc.
        I used the following materials at the following costs, and bought almost all the materials online:

        Koval 48" LED light hood - $65
        Plant substrate (black) - $45
        Sand (white) - $20
        Wood (spider and Malaysian driftwood) - $30
        Air tubing (25 ft) and check valves (4) - $7
        Small dual sponge filters (4) - $11
        Rock - $30
        4 outlet adjustable air pump - $30
        Plants - $80

        I rinsed the substrate until the water was relatively clear, and submerged the wood in dechlorinated water to leach out some tannins and help it sink (I actually did this a few days before the aquascaping).
        First I added plant substrate, followed by wood, rock, and sand if I wanted sand in the tank. I then cut my tubing into 4 six foot lengths. I then cut each six foot length down 14" and added a check valve. I attached the valve end of the tubing to the sponge filters and the opposite end of the tubing to the pump. I also hooked up the light bar (I added risers to the side of the tank for the light bar to sit on).

        I then turned the pump on and allowed the sponge filters to run for a few days. Over the course of those few days I added a couple of heartier rhizome plants (Java Fern and anubias) and a few fish to each tank. The fish were some I already had. At this point, the tank looked like this:

        Click image for larger version

Name:	Screenshot_20190720-202932.jpg
Views:	1
Size:	23.2 KB
ID:	24584886

        Over the course of the following week the water cleared, and I added several more species of plants (wisteria, hornwort, moneywort, pygmy swordgrass, and duckweed).

        I then slowly began adding different fish to each tank. This is how it looks now:

        Click image for larger version

Name:	Screenshot_20190720-214727.jpg
Views:	1
Size:	22.0 KB
ID:	24584887

        The far left tank is full of guppies and a couple oto cats.
        Click image for larger version

Name:	Screenshot_20190720-214746.jpg
Views:	1
Size:	32.3 KB
ID:	24584888

        Tank 2 has Bolivian Ram Cichlids and a pleco.
        Click image for larger version

Name:	Screenshot_20190720-214758.jpg
Views:	1
Size:	32.9 KB
ID:	24584889
        Click image for larger version

Name:	Screenshot_20190720-214858.jpg
Views:	1
Size:	40.9 KB
ID:	24584890

        Tank 3 has Chili and Galaxy Rasbora's and a Chinese algae eater.
        Click image for larger version

Name:	Screenshot_20190720-214811.jpg
Views:	1
Size:	37.1 KB
ID:	24584891

        Tank 4 has Cardinal and Congo Tetras and another Chinese algae eater.
        Click image for larger version

Name:	Screenshot_20190720-214824.jpg
Views:	1
Size:	29.6 KB
ID:	24584892

        And that's pretty much it. I learned alot and can't wait for the next build! Thanks for following along!

        Comment


          #5
          Very nice. Thanks for sharing.


          Sent from my iPhone using Tapatalk

          Comment


            #6
            Very cool. Nice job.

            Comment


              #7
              Good looking setup. Debating on weather i want to build or order a custom aquarium for an built-in area by our front door.

              Comment


                #8
                We’re moving to our forever home in two weeks and I said I’d build another reef tank once that time comes. This ain’t helping lol nice build

                Comment


                  #9
                  Thats pretty dang cool !!!!!!!!

                  Comment


                    #10
                    That’s awesome, I’ve never seen a fish subdivision before.

                    Comment


                      #11
                      That’s awesome! Well done!

                      Comment


                        #12
                        Thanks fellas! The next build will take place in a week or two, and will be bigger. I'll try to do a better job of photo documentation.

                        Comment


                          #13
                          Very cool, and thanks for documenting. I think you did a great job for your first time. In for the second round!

                          Comment


                            #14
                            Nice. How many watts on the lighting set up? Love live plants. I bucked convention and used an UG filter with live plants and 2 power heads. Lighting and co2 were my biggest issues keeping some plants looking great. Java ferns, ludwigia, swords, and horns wart would do good in lower wattage lighting. I bred angels, tetras for years. My favorite is the clown loach.

                            Comment


                              #15
                              Thanks gentlemen. E.TX.BOWHUNTER, these are the light specs by LED type:
                              1)White LEDs: 132pcs(8000K,0.1w)
                              2)Blue LEDs: 12pcs(460nm, 0.1W)
                              3)Green LEDs: 4pcs(500nm, 0.97W)
                              4)Pink LEDs: 4pcs (465nm, 0.1W)
                              5)Red LEDs: 4pcs (625nm, 0.08W)
                              So far the anubias, Java fern, hornwart, and duckweed are doing great. Not much success on carpeting plants. I do not run any co2 though, and imagine that would help. I start build #2 tomorrow. It will be about 55 gallons.

                              Comment

                              Working...
                              X