Announcement

Collapse
No announcement yet.

Fish Feeder Build--Directional

Collapse
X
 
  • Filter
  • Time
  • Show
Clear All
new posts

    Fish Feeder Build--Directional

    Our fish feeder is acting up, so I started looking for something different. The cheaper one's I found looked like they would feed coons real good and were over my budget. The good ones that look like they were coon resistant were way out of my budget.

    So I start gathering up what parts we had and started designing one in my head. My 2 targets were as cheap as possible and coon resistant. Fish food is pricier than corn.

    WE had a 12 volt motor, timer and plenty of barrels. Here is my design/build. I will design as I go.
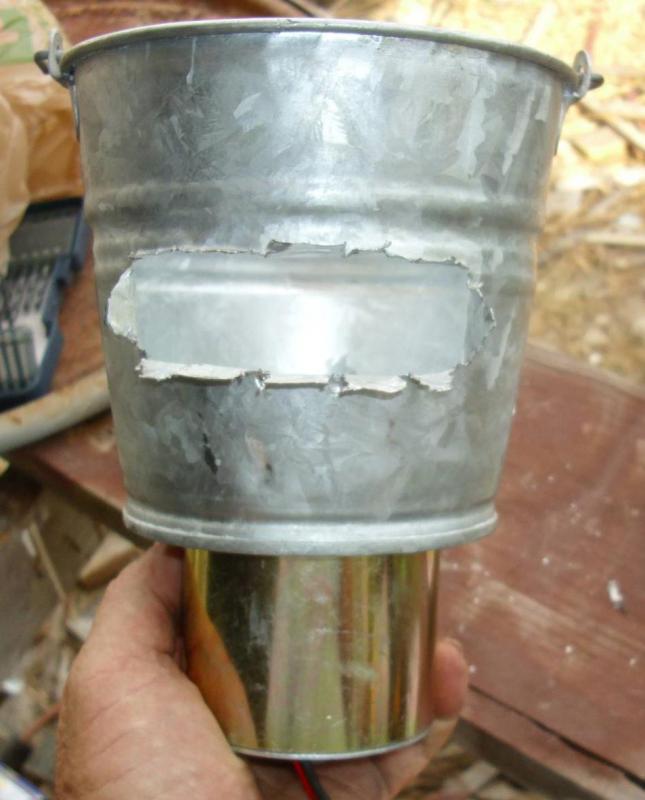
    First I bought a small bucket and a 5" dia round spinner
    Click image for larger version

Name:	parts small_crop.jpg
Views:	1
Size:	78.1 KB
ID:	24975086

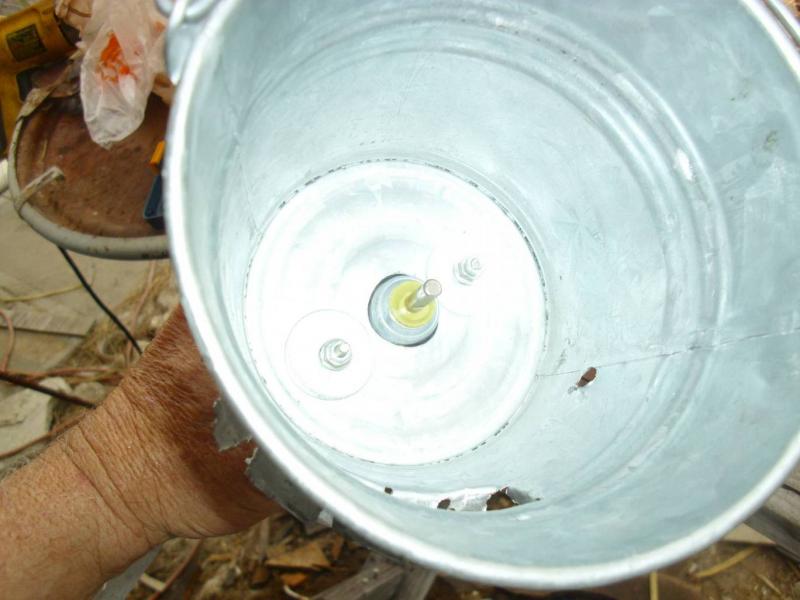
    After doing quite a bit of measuring I determined where the spinner would fit in the bucket. I cut a slot in the bucket about 1 1/2" tall above where the plate would set. I cut the center and folded both ways so that I would have something to attach to later.

    Click image for larger version

Name:	bucket slot.jpg
Views:	1
Size:	58.5 KB
ID:	24975087

    I then mounted the motor to the bottom of the bucket. I discovered that to get the shaft far enough in to the bucket I had to take the nuts off the motor carefully and mount it flat to the bucket.

    Click image for larger version

Name:	mount 1.jpg
Views:	1
Size:	49.8 KB
ID:	24975089

    Click image for larger version

Name:	motor mount 2_crop.jpg
Views:	1
Size:	50.7 KB
ID:	24975090

    More to come if anyone is watching

    #2
    Great idea! I Subscribed

    Comment


      #3
      Im watching. Keep it coming.

      Comment


        #4
        More tomorrow pics are slow to download.

        Comment


          #5
          Following. Looks interesting so far. I'm sure you'll build something cool that actually works!

          Comment


            #6
            Interested to see how it turns out myself....

            Comment


              #7
              After mounting the motor, I took the bucket handle off and cut off the tabs that hold it. To mount the spinner plate I had to drill a hole big enough for a screwdriver in the bucket below the plate and tighten the screw through it.

              Here I stopped and did some thinking. I did not want to cut off the top of the bucket because I was afraid it would weaken it and fail due to vibration. I instead took 2 funnels we had and mounted them together so as to get down closer to the plate.

              Click image for larger version

Name:	funnel ext.jpg
Views:	1
Size:	60.5 KB
ID:	24220609

              I then attached the motor with some adjustable straps from an and feeder. I do not expect to be adjusting this much, because it will not be easy once finished. Because of the way it is being built I do not expect to have problems with wind blown feed so I set it a little loose. I intend to adjust the amount thrown strictly by time.

              Click image for larger version

Name:	door.jpg
Views:	1
Size:	78.7 KB
ID:	24220610

              I built a metal frame for the door and to stabilize the sheet metal.

              Click image for larger version

Name:	backside.jpg
Views:	1
Size:	98.0 KB
ID:	24220611

              More later tonight

              Comment


                #8
                Yes it looks a little rough. But the idea this time is cheap and functional. I have been using what ever I had to work with.

                I messed up pics tonight so more tomorrow.

                Comment


                  #9
                  looks like a good one. Like the reinforcement... still following and ready to see the finished product..

                  Comment


                    #10
                    First half of tonight

                    Here we go. For sheet metal I am using a piece of roofing v groove tin.

                    Click image for larger version

Name:	sheet metal.jpg
Views:	1
Size:	93.9 KB
ID:	24220848

                    For a grate to keep the coons out, I found a grill out of an old pit. I cut to size and then
                    cut every other bar out for the feed to get through easier.

                    Click image for larger version

Name:	grill.jpg
Views:	1
Size:	78.3 KB
ID:	24220849

                    I then started working on the cone. It took several times to get the sides right. being as I was working with 2 angles.


                    Click image for larger version

Name:	grate.jpg
Views:	1
Size:	75.7 KB
ID:	24220850

                    Click image for larger version

Name:	cone 1.jpg
Views:	1
Size:	63.1 KB
ID:	24220851

                    Before I put the last piece in I cut notches in the top and bottom to slip the grate in and to use the tabs to secure it.

                    Click image for larger version

Name:	cone 2.jpg
Views:	1
Size:	60.5 KB
ID:	24220852

                    The whole cone was designed to be free of obstacles so the feed had nothing to hang on.

                    Click image for larger version

Name:	cone final.jpg
Views:	1
Size:	76.3 KB
ID:	24220858

                    Comment


                      #11
                      Thursday nite part 2

                      Installed a piece for floor support and the back of the area where the Battery and timer will go. Remember it is still upside down.

                      Click image for larger version

Name:	back.jpg
Views:	1
Size:	81.2 KB
ID:	24220875

                      Put the floor in. It is starting to look like a feeder

                      Click image for larger version

Name:	getting close.jpg
Views:	1
Size:	62.0 KB
ID:	24220876

                      Finally time to turn it over and work on the top side.

                      Click image for larger version

Name:	DSCI0124_crop.jpg
Views:	1
Size:	50.2 KB
ID:	24220877

                      Tomorrow the legs and funnel.

                      Comment


                        #12
                        Hey! You didn't build that!

                        Couldn't resist. Excellent work and craftsmanship.

                        Comment


                          #13
                          Rick - you are one resourceful dude! Can't wait to go fishing for those fat fish you are gonna make for us

                          Comment


                            #14
                            looking good. What will keep the feed from building up inside the bucket under the spinner plate?

                            Comment


                              #15
                              Size, 1/8" clearance at all points. I am concerned about long term food dust build up and will be watching that. The bucket/motor combination is removable by taking it loose at the adjusment brackets.

                              Comment

                              Working...
                              X