I don't know what I'm supposed to be looking for, but that looks like something you'd see in an awesome landscapes calendar.
One of these days I might graduate past a point-n-shoot!
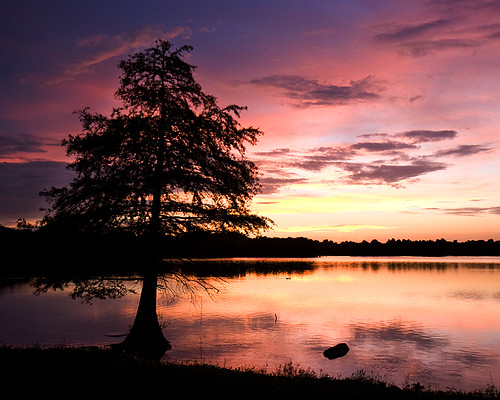
To put it plainly, the filter allowed me to capture detail in the foreground while exposing the sky, clouds and water without blowing them out (all white). The filter is "smokey" on top and clear on the bottom so you can achieve this balance. They look like this
The photo below, shot without one of these filters, shows you how the foreground goes black due to exposing for the brighter sky. The exposure is so quick due to the available light in the sky, that the ground goes black due to a lack of light for that part of the frame.
Casey, I REALLY want a reverse grad. That's exactly what a sunset shot needs, and I love sunset shots. I'm thinking a reverse grad 3-stop and then a 3- and a 10-stop ND would probably do me. That dang Singh-Ray reverse grad is a heck of an investment (for a filter), but I'm planning to get one when business picks back up.
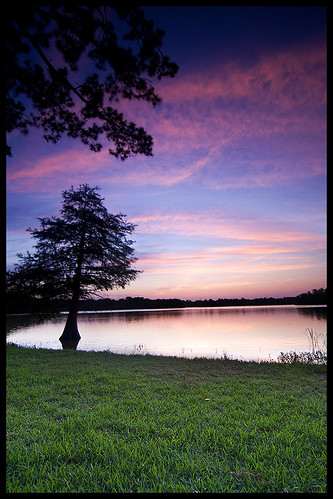
Here is another from last night. I think the top part of the sky went too dark on me. I guess I need one of those not so cheap reverse gnd.
The top is a bit dark but it is still an awesome picture. I have no idea what a reverse gnd. is, but if it is the filter you were describing to me that is "clear" then dark then "clear"?...
I think you used the 3 stop and maybe the 2 or 1 stop may have put a tad bit more light into the tree canopy? I like the effect as is....no sense in adding a ton of tree canopy detail to this shot....the cypress tree trunk detail looks great as is.
It's easy to meter the foreground and set the exposure (manual mode) for the scene before sliding the filter into position. Then while the preview control holds the lens aperture in the close-down position, move the ND Grad up or down to position the ND graduation effect where you want it (you may need to turn your filter holder slightly to match your horizon line, too). As you move the filter, the graduation will become much more apparent.
The image area being filtered will change according to your aperture setting, with the smaller apertures yielding a greater percentage of area covered by the filter. However, this is not visible when viewed through your lens if it's wide open. Use the depth of field preview control you (hopefully) have on your camera. This will better help you to visualize and position the filter for its desired effect.
These filters work best with flat or regular horizon lines. Any subject passing from the foreground through the horizon into the sky will also end up being filtered. If that subject is in silhouette however, this will not be a problem.
Wide angle lenses, because of their inherent greater depth of field (particularly with smaller apertures), will deliver a more pronounced and noticeable graduation than longer (50mm and up) focal lengths. My personal preference, however is with lenses in the 17 to 28mm range.
I have no idea what that means I just cut/paste from some fancy website....Pics look great to me!
 Absolutely stunning!


Comment