Announcement

Collapse
No announcement yet.

DIY stabilizer light 2.0

Collapse
X
 
  • Filter
  • Time
  • Show
Clear All
new posts

    DIY stabilizer light 2.0

    Well after building a light from the original DIY stabilizer thread and using it a couple of times I decided I wanted a little bit brighter option. So this is my take on it.
    First the flashlight
    Click image for larger version

Name:	ImageUploadedByTapatalk1362535432.640983.jpg
Views:	1
Size:	72.9 KB
ID:	24953597 it's a 200 lumen Ozark Trails flashlight. I bought it at Wally World for about $30.
    Click image for larger version

Name:	ImageUploadedByTapatalk1362535582.812603.jpg
Views:	1
Size:	50.3 KB
ID:	24953609 you need to drill a whole through the side that is on the same side as the button then drill another whole into the body and run your switch through like so. Click image for larger version

Name:	ImageUploadedByTapatalk1362535659.811842.jpg
Views:	1
Size:	54.1 KB
ID:	24953613Click image for larger version

Name:	ImageUploadedByTapatalk1362535678.433457.jpg
Views:	1
Size:	47.6 KB
ID:	24953614
    Since there isn't a strip that connects the positive and negative terminals like the original light you can't clip it but the cap of the flashlight is what actually completes the circuit
    Click image for larger version

Name:	ImageUploadedByTapatalk1362535838.199710.jpg
Views:	3
Size:	51.9 KB
ID:	24953617
    You just need to insulate this from the battery terminals so I just used some duct tape and a piece of plastic to prevent the set screw from ripping the tape off. Click image for larger version

Name:	ImageUploadedByTapatalk1362535927.942353.jpg
Views:	1
Size:	47.1 KB
ID:	24953618
    I then just drilled a whole through the cap and put my stabilizer screw into place Click image for larger version

Name:	ImageUploadedByTapatalk1362536042.945871.jpg
Views:	1
Size:	61.1 KB
ID:	24953619 
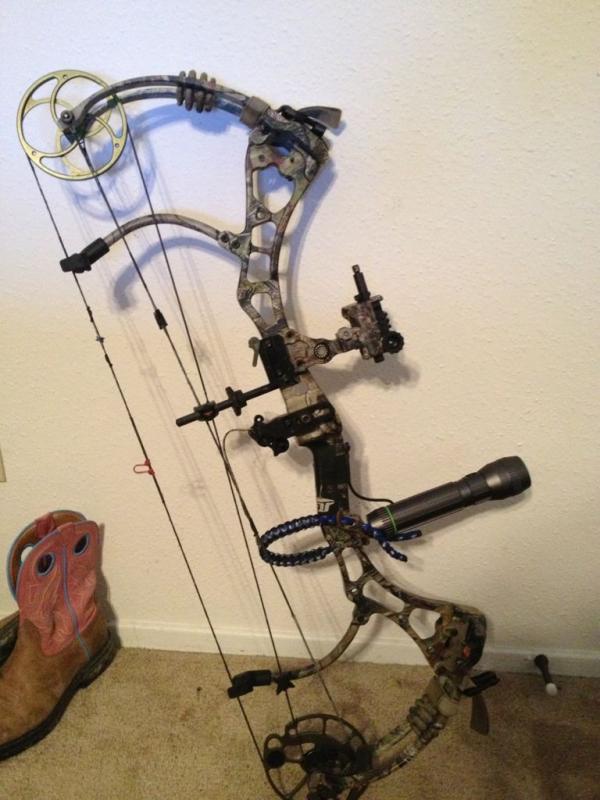
this is it mounted to the bow. I used a red permanent marker to color the lens. Seems to work really well, definitely brighter than the last one. Hope to get some LDP's this weekend!
    Attached Files

    #2
    Don't know why it posted the last two pics but this is it after I put some camp tape on it Click image for larger version

Name:	ImageUploadedByTapatalk1362536431.251656.jpg
Views:	1
Size:	55.8 KB
ID:	24177761 here is a pic at 15 yards Click image for larger version

Name:	ImageUploadedByTapatalk1362536513.946628.jpg
Views:	1
Size:	35.3 KB
ID:	24177762

    Comment


      #3
      Nice! I'm always a fan of DIY when it can save you hundreds of dollars.

      Comment


        #4
        I think i have the same bow as you is that a bear mauler?

        Comment


          #5
          Make me one, and send it this way.

          Comment


            #6
            Originally posted by EastTexasHogs View Post
            I think i have the same bow as you is that a bear mauler?
            It's a little bit older, it's the Attack

            Comment


              #7
              Originally posted by deercrazy View Post
              Make me one, and send it this way.
              It would be a whole lot easier to mail than the bow!

              Comment


                #8
                Originally posted by plentl65 View Post
                It would be a whole lot easier to mail than the bow!
                Lol that's what I was thinken.

                Comment


                  #9
                  Maybe rig out a small hand spotlight, to do the job.

                  Comment


                    #10
                    They have a 400 lumen for 40 dollars I wanna try next, just don't want it to be too bright

                    Comment


                      #11
                      That will probably be fine.

                      Comment


                        #12
                        What did you use for the switch?

                        Comment


                          #13
                          Click image for larger version

Name:	ImageUploadedByTapatalk1362576648.048364.jpg
Views:	1
Size:	47.6 KB
ID:	24177810 I don't have an exact picture if the pressure switch but tho is the package from RS. Click image for larger version

Name:	ImageUploadedByTapatalk1362576731.250872.jpg
Views:	1
Size:	43.4 KB
ID:	24177812 this is what it looks like after you out shrink tube on it

                          Comment


                            #14
                            Soldering the switch is by far the hardest part out of the build, everything else is really easy

                            Comment


                              #15
                              Up

                              Comment

                              Working...
                              X