Announcement

Collapse
No announcement yet.

Working With 1/3rds. The "Rule" of Thirds

Collapse
X
 
  • Filter
  • Time
  • Show
Clear All
new posts

    Working With 1/3rds. The "Rule" of Thirds

    The technical stuff first:
    Canon XTi
    Canon 70-300mm 4,5.6 IS USM
    1.5x Kenko Tele Converter
    It was Noon and Cloudy.

    1/400 Sec
    F5.6
    300mm x 1.5 = 450mm
    ISO 800
    Aperture Priority AV
    WB at Cloudy setting.

    I've been after this Yellow-crowned Night Heron for 2 weeks. Today at lunch he struck a good pose and I got 3 exposures. In the view finder I placed him in the lower right and waited for the right look. After looking at the eposure I cropped it a bit and began to notice something really wrong:


    First of all the longer I looked at it the more my eyes were drawn to the center of the picture because of the tree with exposed limbs on the left. The picture had the makings of a good shot with the Heron staring intently down towards the left 1/3 of the pic. So I had the thirds covered from upper right to the lower left. It was telling a story.
    Secondly the focus is a bit soft, but I wasn't too concerned about that.
    The tree had to go.
    I use Photoshop Elements 4 and am not real good at it but I did a fair job and can improve later:


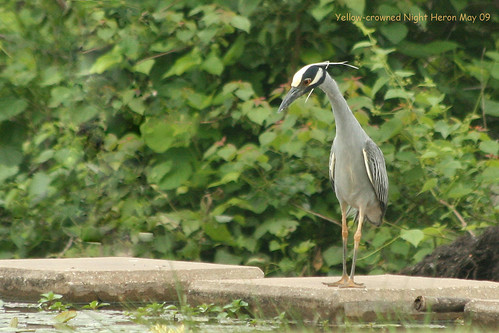
    With the tree gone it's easier to be drawn to the Heron which of course is the subject. The photo goes ahead and allows a closer look at where the Heron is looking.
    Next is to lighten the background a little and I have no clue on doing that except to clip out and save the bird. Lighten the background and put the bird back in place. The heron just needs to pop out a bit more.
    OR.
    Hang out for better light and more shots.
    After going through 3 years of Art classes this is just what I walked away with concerning composure using Thirds.
    Not a great photo but hope the visual change helps others.
    As a second thought ISO 200 would have helped the sharpness issue.
    Last edited by Bluesman; 05-07-2009, 07:44 PM.

    #2
    The tree doesn't bother me all that much. Another way to make the heron pop more is to use the blur tool to de-emphasize the background only. This can give it an out-of-focus look similar to using a large aperture setting. I didn't spend much time on this, so the blurring isn't real even, but you get the general idea..

    Click image for larger version

Name:	heron.jpg
Views:	1
Size:	125.1 KB
ID:	23884913

    What do you think? I use this on avatars quite a bit to de-emphasize distracting stuff in the background without doing major photoshop work.

    Comment


      #3
      Originally posted by Snakelover View Post
      What do you think? I use this on avatars quite a bit to de-emphasize distracting stuff in the background without doing major photoshop work.
      Yep, the background was too sharp and busy. Thanks for the suggestion.

      Comment


        #4
        That's exactly what I was going to suggest. Bokeh the backround with some guassian blur, and maybe darken and/or slightly desaturate the background too. That's a cool shot already though.

        Comment


          #5
          Same as above.

          That is a really great shot, and a very cool bird!!

          Comment


            #6
            The tree doesn't bother me at all either Bill, great capture.

            Comment


              #7
              Thanks guys. I just recieved a Canon EF 100-400 L IS From Rent Glass today and so far my current lens arrangement is better than the L. Bad Copy? Maybe. But I'm really disappointed. Learning curve? I hope so.
              I'm working on getting another copy but it will be Monday. They do have great customer service.

              Comment


                #8
                Bill, here's my stab at it... Blurred the background with guassian blur. Sharpened the foreground (unsharp mask) and boosted saturation and contrast (via curves). Also did a bit of color burn on the stones and water.

                I didn't get a perfectly clean selection of the background/foreground edges, but you get the idea.

                Comment


                  #9
                  Looks pretty good Shane. What in the world is "guassian blur"?
                  I'm going after that bird again soon.
                  Last year this immature bird was at the same pond:


                  Would be neat if this is the same one a year older

                  Comment


                    #10
                    Originally posted by Bluesman View Post
                    What in the world is "guassian blur"

                    Sorry, I figured you'd seen it in the menus. In Photoshop (I'm not sure about Elements), if you go to the Filter menu, then to Blur, you'll find Gaussian Blur. (I spelled it wrong the first time)

                    That would be very cool if you got the same bird as last year. Very possible, I'd imagine.

                    Comment


                      #11
                      Wow, I'm sending all my photoshop work to Shane from now on!

                      Comment


                        #12
                        Originally posted by Shane View Post
                        Sorry, I figured you'd seen it in the menus. In Photoshop (I'm not sure about Elements), if you go to the Filter menu, then to Blur, you'll find Gaussian Blur. (I spelled it wrong the first time)

                        That would be very cool if you got the same bird as last year. Very possible, I'd imagine.
                        I missed one I had never seen a while ago. Similar in shape but much smaller. I've got the book out on this guy. New pond too, not much cover and too many goffy kids scaring things away.

                        That blur is in Elements 4. Many thanks for the heads up.
                        Last edited by Bluesman; 05-09-2009, 02:16 PM.

                        Comment


                          #13
                          Very nice!!!


                          Sure wished I knew Photoshop....maybe some day.

                          Comment


                            #14
                            Originally posted by Shane View Post
                            Sharpened the foreground (unsharp mask)...........
                            Got all of it but this. Shane did you work a single image or create layer(s)? A little explanation on the above part if you care to.
                            Originally posted by Snakelover View Post
                            Wow, I'm sending all my photoshop work to Shane from now on!
                            Me too!!
                            Originally posted by AtTheWall View Post
                            Very nice!!!


                            Sure wished I knew Photoshop....maybe some day.
                            Me too!!

                            Bill I'll say again you have a nice image. Enjoy the lens.

                            Comment


                              #15
                              Originally posted by Bill M View Post
                              Got all of it but this. Shane did you work a single image or create layer(s)? A little explanation on the above part if you care to.
                              Sure Bill, if I can remember what I did. There are multiple ways to skin a cat, using layers. Usually, I'll keep the original as the background layer and then make any edits or adjustments on subsequent layers. This time I was working on my desktop and it has Photoshop CS (original, not a newer version). It's a little different than the CS3 on my laptop that has a bad motherboard right now, so I was limping along on CS.

                              Anyway, I copied the background to a 2nd layer. Then I blurred the entire background layer. Then I switched to the 2nd layer. I set up a brush to "Clear" and painted over all the background bushes, revealing the blurred background layer. (I couldn't get a history brush to work right for some reason, so I did it this way.)

                              Then I copied that 2nd layer to a 3rd layer to make the contrast, saturation, and color burn adjustments. I did this in a copy layer in case I screwed it up. After clearing away the 2nd layer to show the blurry bushes, I didn't want to have to do that again, so I made sure I didn't screw the 2nd layer up once I got it finished. I did end up going to heavy on the color burn, so I scrapped the 3rd layer and did it again. I was glad I had the 3rd layer at that point.

                              Comment

                              Working...
                              X