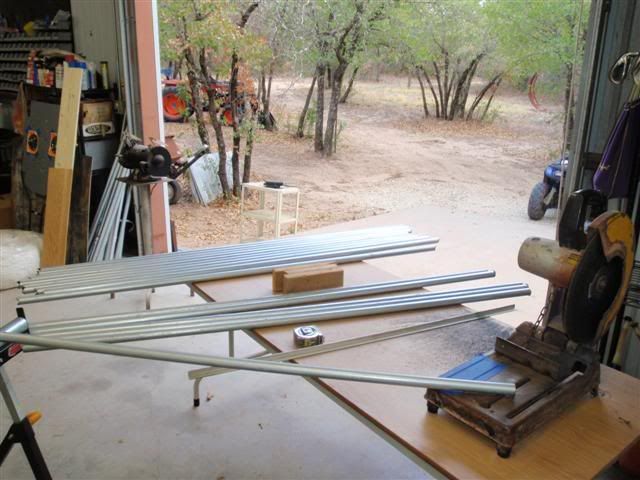
So I was walking through the back lot at work, and there was a big pile of conduit for the scrap man, and it got me to thinking….
I really would love to own a nice pop up blind, but they are a bit cost prohibitive right now. How can I make a blind that is similar in size and shape, still relatively simple to move and keep the cost down? I'll weld up a frame out of EMT, top it with corrugated tin or vinyl, and wrap it with sun screen mesh so it's not so miserable to hunt in the warmer months. I can put in plenty of windows, cover them with screen, and it will be plenty sturdy. Stake it down so it doesn't blow away in high winds, and you're golden! This is my first attempt, the prototype if you will. So far, I'm into it for less than $100. Basically it's a 6' cube, with lots of windows (8 windows). I need for it to be sturdy enough to stand up to the weather, but light enough that one or two men can move it easily.
*1" trade size EMT weighs .67lb per foot. I'll total up the footage for this stand to help nail down total weight
Safety:
First off, welding anything that is galvanized, is noxious, so take proper precautions. I invested in a respirator that filters out the zinc fumes (the stuff that makes you sick; zinc poisoning is bad stuff and can damage your respiratory system) I also ponied up for a good set of goggles (yes, even under my welding helmet). Hearing protection, appropriate gloves, a heavy starch long sleeve shirt and pants, and boots finish it off for PPE.
I start with bending up 2 hoops, 6' square (my top and bottom) Everything else will be straight, and either notched or miter cut to keep it simple.
The tin is screwed down to the top hoop, and also at the spreader bars using self tapping (TEK) lath screws.
The door is again straight pieces of EMT, welded at the corners with miter cuts. I put a window in the door, so's not to miss any shooting opportunity that may come up in the back. The door is hung with a simple screen door kit. 2 hinges, a spring and a handle. I'll add some felt pads to soften the sound when the door slams.
Windows are 12" wide and 36" tall in the flat portions of the blind. Corners are similarly dimensioned.
I chose to wrap this first one with shade mesh (like you'd see over a patio or a playground), rather than something solid. It doesn't offer me any advantages as far as scent control goes, but it sure allows some air to circulate when it's so darn warm in the early season, spring and summer months. This first blind may well wind up on a tower at some point. We'll see.
The windows will be covered with basic fiberglass window screen (insect screen). Some folks here have fiddled with it, and it seems like a good idea to me, so I'm gonna use it. I plan to hold it in place with magnets. It's solid in theory, we'll see how it works when I go to test it. I may have to build some frames and put it in that way. I can roll spline with the best of 'em.
I plan to weld some tabs to the bottom rail, for putting a stake through. I'll also add a nice big hook to the ceiling for a bow hanger, and an eye bolt in the center for a battery operated fan and light to hang from. I'll probably add another hook for a backpack hanger, and a shelf for the requisite drink and binoculars holder.
My seating arrangement is an office chair.
So far, I have 7 hours invested in it.
Work Completed:
I plan to go and spend some more time working on it in a couple of weeks. I think I can be substantially complete in a long day.
Starting to cut:
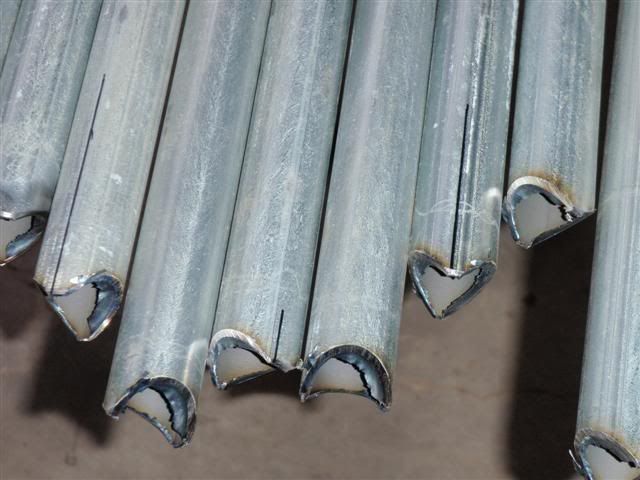
Notched:
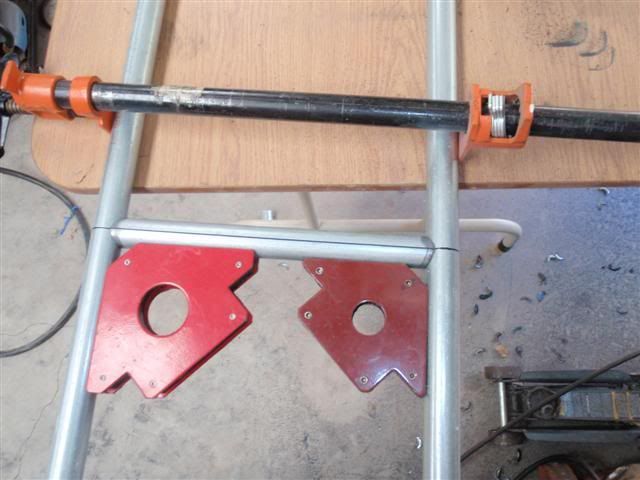
Ready to tack:
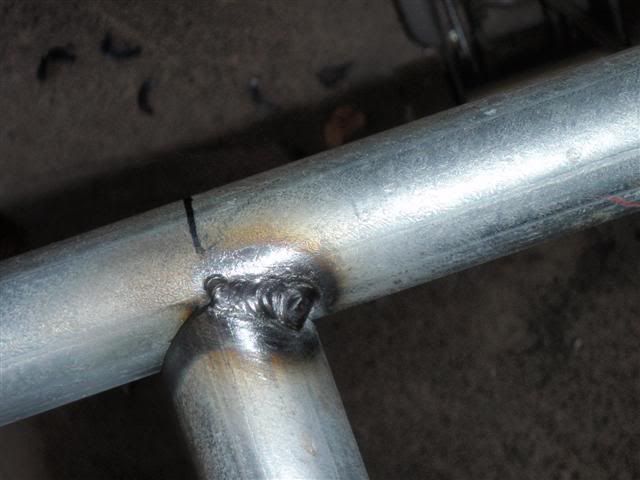
Tack weld:
Starting to bend:

I really would love to own a nice pop up blind, but they are a bit cost prohibitive right now. How can I make a blind that is similar in size and shape, still relatively simple to move and keep the cost down? I'll weld up a frame out of EMT, top it with corrugated tin or vinyl, and wrap it with sun screen mesh so it's not so miserable to hunt in the warmer months. I can put in plenty of windows, cover them with screen, and it will be plenty sturdy. Stake it down so it doesn't blow away in high winds, and you're golden! This is my first attempt, the prototype if you will. So far, I'm into it for less than $100. Basically it's a 6' cube, with lots of windows (8 windows). I need for it to be sturdy enough to stand up to the weather, but light enough that one or two men can move it easily.
*1" trade size EMT weighs .67lb per foot. I'll total up the footage for this stand to help nail down total weight
Safety:
First off, welding anything that is galvanized, is noxious, so take proper precautions. I invested in a respirator that filters out the zinc fumes (the stuff that makes you sick; zinc poisoning is bad stuff and can damage your respiratory system) I also ponied up for a good set of goggles (yes, even under my welding helmet). Hearing protection, appropriate gloves, a heavy starch long sleeve shirt and pants, and boots finish it off for PPE.
I start with bending up 2 hoops, 6' square (my top and bottom) Everything else will be straight, and either notched or miter cut to keep it simple.
The tin is screwed down to the top hoop, and also at the spreader bars using self tapping (TEK) lath screws.
The door is again straight pieces of EMT, welded at the corners with miter cuts. I put a window in the door, so's not to miss any shooting opportunity that may come up in the back. The door is hung with a simple screen door kit. 2 hinges, a spring and a handle. I'll add some felt pads to soften the sound when the door slams.
Windows are 12" wide and 36" tall in the flat portions of the blind. Corners are similarly dimensioned.
I chose to wrap this first one with shade mesh (like you'd see over a patio or a playground), rather than something solid. It doesn't offer me any advantages as far as scent control goes, but it sure allows some air to circulate when it's so darn warm in the early season, spring and summer months. This first blind may well wind up on a tower at some point. We'll see.
The windows will be covered with basic fiberglass window screen (insect screen). Some folks here have fiddled with it, and it seems like a good idea to me, so I'm gonna use it. I plan to hold it in place with magnets. It's solid in theory, we'll see how it works when I go to test it. I may have to build some frames and put it in that way. I can roll spline with the best of 'em.
I plan to weld some tabs to the bottom rail, for putting a stake through. I'll also add a nice big hook to the ceiling for a bow hanger, and an eye bolt in the center for a battery operated fan and light to hang from. I'll probably add another hook for a backpack hanger, and a shelf for the requisite drink and binoculars holder.
My seating arrangement is an office chair.
So far, I have 7 hours invested in it.
Work Completed:
- Both hoops bent
- 16 Vertical pieces cut, notched and dressed
- 14 horizontal pieces cut, notched and dressed
- 3 window sections tacked up and ready to install
I plan to go and spend some more time working on it in a couple of weeks. I think I can be substantially complete in a long day.
Starting to cut:
Notched:
Ready to tack:
Tack weld:
Starting to bend:
Comment