Announcement

Collapse
No announcement yet.

4-way Free Choice Protein Feeder

Collapse
X
 
  • Filter
  • Time
  • Show
Clear All
new posts

    4-way Free Choice Protein Feeder

    I recently had a fellow TBHer ask that I build a 4-way Free Choice Protien Feeder for him. So I thought I'd document the process along the way for all you D-I-Y-ers.

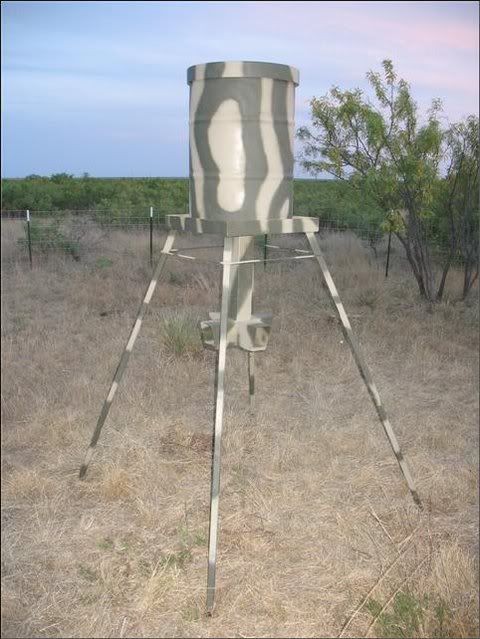
    I'd like to say this can be added to most any barrel or rounded bottom container. It is built from 16 gauge 4"x4" square tubing. Here is what the finnished product should look like when your done.

    Click image for larger version

Name:	finnished product.JPG
Views:	1
Size:	65.1 KB
ID:	24729235

    First take a mesurement from the bottom of your container to the ground. This mesurment is "X". (this case it happend to be 72")

    Click image for larger version

Name:	determine the distance.JPG
Views:	1
Size:	65.5 KB
ID:	24729236

    Now subtract 42" from mesurement "X" and it leaves you mesurment "Y". Add 2" to "Y". Example: my distance was 72" less 42" = 30" + 2" = 32". This will be the length of the down tube known as part "D" below. Turst me, it will come out right

    (42 inches is the distance from the bottom of the feeder to the ground. This is, in my experiance, is the most comfortable distance for deer to feed where they feel safe. They do not have to lower their heads. Does can easly rake feed out for yearlings. I have witnessed this in action. It also helps to keep the smaller pigs and coons from reaching the protien.)

    You will be cutting 4 peices of 4"x4" tubing as in the following pic.

    Peice "A" is 16" long
    Peice "B" is 6" long
    Peice "C" is 6" long
    Peice "D" was determined above .

    Click image for larger version

Name:	4 peices of 4-inch  tube.JPG
Views:	1
Size:	68.5 KB
ID:	24729238

    #2
    Now find the center of part "A" and mark 2" each direction. This will form a 4" cut-out and will be on three sides of "A".

    Click image for larger version

Name:	center cutting of A.JPG
Views:	1
Size:	51.3 KB
ID:	23836870

    Now place "D" on the top of "A" and tack in 4 places. There should be a cut out on both sides of A" for parts "B" and "C".

    Click image for larger version

Name:	tacks at A ad D only.JPG
Views:	1
Size:	49.5 KB
ID:	23836871

    Click image for larger version

Name:	tacks at D and A only.JPG
Views:	1
Size:	46.6 KB
ID:	23836872

    Get the bottoms of parts "B" and "C" on the same plane as "A" and tack at the lower corners where A" and "B" meet on both sides as in the above pics.. Do the same for where "A" and "C" meet. Level the bottoms of "B" and "C" and tack in the upper corners where "A" meets "B" and "C" meet.

    Now weld all seams.

    Click image for larger version

Name:	all 3 peices welded.JPG
Views:	1
Size:	69.5 KB
ID:	23836876

    Bottom seam welded view

    Click image for larger version

Name:	bottom seam welded.JPG
Views:	1
Size:	70.1 KB
ID:	23836877

    Comment


      #3
      Next invert and make a 2" cut on the bottom of each corner inward.

      Click image for larger version

Name:	cuts for lips.JPG
Views:	1
Size:	59.8 KB
ID:	23836878

      Take a hammer and gently tap each cut inward till it is slightly bent inside as below. This will help keep the feed from running out oto the ground. It can be easly adjusted when in the field, should you be on unlevel ground .

      Click image for larger version

Name:	lip bent inward.JPG
Views:	1
Size:	58.0 KB
ID:	23836879

      Comment


        #4
        Grind all rough edges and burrs smooth.

        Turn feeder upright and make a 6" cut down the top of each corner of the down tube, part "D".

        Click image for larger version

Name:	cuts for flaps.JPG
Views:	1
Size:	70.2 KB
ID:	23836880

        Now take your hammer and tap each side out till it is at a rigt angle to the down tube. These are the down tube flaps and will attach to the bottom of your barrel. (Should you have a rounded or cone shaped container, tap them out till they just fit over it.)

        Click image for larger version

Name:	flaps folded down.JPG
Views:	1
Size:	69.0 KB
ID:	23836881

        Comment


          #5
          Each flap is there to help distribute the stress and weight over the bottom of the barrel and to increase barrel life.

          To stiffin the bottom up more, I have added an internal stiffiner that helps take the weight out to the sides. it is made from 10 gauge.

          Click image for larger version

Name:	Washer.JPG
Views:	1
Size:	93.4 KB
ID:	23836882

          Click image for larger version

Name:	washer to help distribute stress.JPG
Views:	1
Size:	45.1 KB
ID:	23836884

          It is just long enough to fit from side to side when inside, wich is where it will be installed. When installed, the feeder and the stiffiner will sandwich the bottom of the barrel between them.

          Click image for larger version

Name:	washer inside barrel.JPG
Views:	1
Size:	42.5 KB
ID:	23836883
          Last edited by Texas Grown; 04-20-2008, 09:25 PM.

          Comment


            #6
            The previous pics already show 1/4" holes drilled in the stiffiner. To make sure they match the flaps on part "D", place and clamp the stiffiner on to two of the flaps, then drill at least 2 holes in each flap. Two of the flaps will be without internal support.

            Click image for larger version

Name:	prepairing to drill holes in washer.JPG
Views:	1
Size:	91.0 KB
ID:	23836885

            Be sure to primer and/or paint every thing welded to help prevent rust/oxydation.

            Click image for larger version

Name:	feeder on top of barrel.JPG
Views:	1
Size:	65.3 KB
ID:	23836887

            Now your almost ready to assemble it.

            Click image for larger version

Name:	washer and feeder togeather.JPG
Views:	1
Size:	59.5 KB
ID:	23836889

            Click image for larger version

Name:	finnished feeder.JPG
Views:	1
Size:	70.1 KB
ID:	23836888

            Comment


              #7
              I do not have pics for the following.

              I use 1/4"x 1" bolts with nylon lock nuts to attatch everything.

              First, a few holes in the barrrel must be drilled. Be sure to orientate stiffiner to match holes of flaps before drilling barrel. Place the stiffiner inside the barrel and drill through one of the 1/4" holes using it as a drill guide. Place a bolt in the hole and tighten with lock nut. Next, drill another hole on the opposing side of the stiffiner and bolt it. Drill your two remaining holes and remove the first two bolts you placed in it. Get a buddy to hold the feeder up on the out side and from the inside, run all 4 boltss through the stiffiner, bottom of barrel, and flaps on the feeder, and tighten the lock nuts on the outside. Invert the barrel so the feeder is up in the air and drill the other 4 holes in the barrel bottom where the other two flaps are. Run bolts form the inside and lock-nut the outside. You are done, unless you want to paint it .

              Comment


                #8
                Man mike that looks great thank you so much. Once I get a welder I can start making my own.

                Comment


                  #9
                  Course your gonna have to put the finnal coat of paint on it

                  Comment


                    #10
                    Great looking project. Thanks, I'll be building a few of these!!!

                    Comment


                      #11
                      Gee Mike for some reason your welds look better than mine. You must have done that a time or two.

                      Comment


                        #12
                        Gary, as soon as I get the tig machine set up here at the house, I'll give ya lessons .

                        Some of the welds I lay at my present job are on .020" aluminum with no burn through or melt through allowed and only .040" wide. Stainless is sometimes .016" and only .025" wide. And borium, is the pits due to health hazard. But it flows. This is on fabricated chopper parts.

                        I worked for another Areo Space company where we had to melt through 3/16" OD tubing (aka dash 3 tubing or -3) the smallest, and up to -20 (1-1/4") the largest, with .020 walls (the min thickness) but were not allowed more than .010" internal penitration (1/2 the meterial thickness). 80 % of the job orders were 100% X-ray. I was allowed .008" of perocity per 1" of weld. I ran slightly less than 1% rejection rate before I left, sometimes running 8,000 parts per month. It was basicly a clean room inviorment.
                        Last edited by Texas Grown; 04-28-2008, 07:14 PM.

                        Comment


                          #13
                          And oh ya, gassless fluxcore stinks!

                          Comment


                            #14
                            Thanks to this post and the previous one posted by Dale Moser I was able to rig up my first diy protein feeder. I hope to build several more as time allows (and if the price of steel doesn't empty my bank account! ).

                            As you can see, I built my base where the feed tube attaches to the barrel a little differently and I also made my 4-way spouts 6" tall, but it seems to have turned out nice. Thanks, guys!!


                            predatorsniper

                            Comment


                              #15
                              Nice work Preditorsniper

                              Comment

                              Working...
                              X