Announcement

Collapse
No announcement yet.

A knife for my brother

Collapse
X
 
  • Filter
  • Time
  • Show
Clear All
new posts

    #16
    sam, heres how I do sheath
    draw a line down the paper, put the knife on it edge up roll the knife either way which ever is comfortable to you.
    Click image for larger version

Name:	IMG_3292.JPG
Views:	1
Size:	87.4 KB
ID:	24317072
    trace the knife and use a ruler to mark out 1/2" from the line you just drew and connect the dots.
    Click image for larger version

Name:	IMG_3293.JPG
Views:	1
Size:	94.7 KB
ID:	24317073
    dots connected
    Click image for larger version

Name:	IMG_3295.JPG
Views:	1
Size:	95.8 KB
ID:	24317074
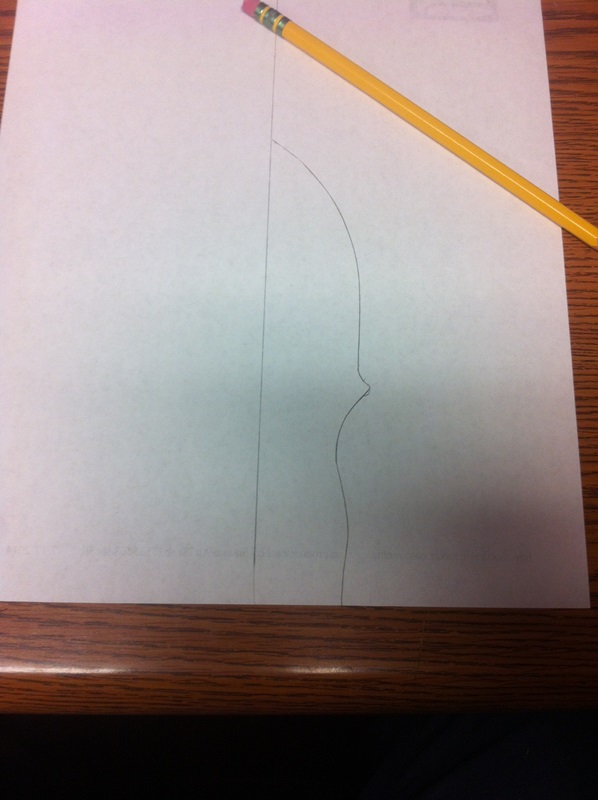
    now I free hand some curves to the sheath flat and straight is not pretty lol. I keep the point that I drew lined up with the finger guard, you can put it anywhere and how ever many you want.
    Click image for larger version

Name:	IMG_3296.JPG
Views:	1
Size:	94.0 KB
ID:	24317075

    Click image for larger version

Name:	IMG_3297.JPG
Views:	1
Size:	92.5 KB
ID:	24317076
    now cut the line you just drew that's the edge of your sheath cut it as smooth as possible since this is your pattern you will trace on the leather.
    Click image for larger version

Name:	IMG_3298.JPG
Views:	1
Size:	110.6 KB
ID:	24317077
    if you look close you can see a few dots below the handle line of the knife these are to draw a line from the widest point of your knife to the edge of the sheath so you can slide the knife in the sheath. make sure before you cut the line you drew that you have enough room to keep the same distance from the edge for your stitching, I use 1/4" from the edge, ill show in another pic beter than what I can explain lol.
    Click image for larger version

Name:	IMG_3299.JPG
Views:	1
Size:	118.3 KB
ID:	24317078
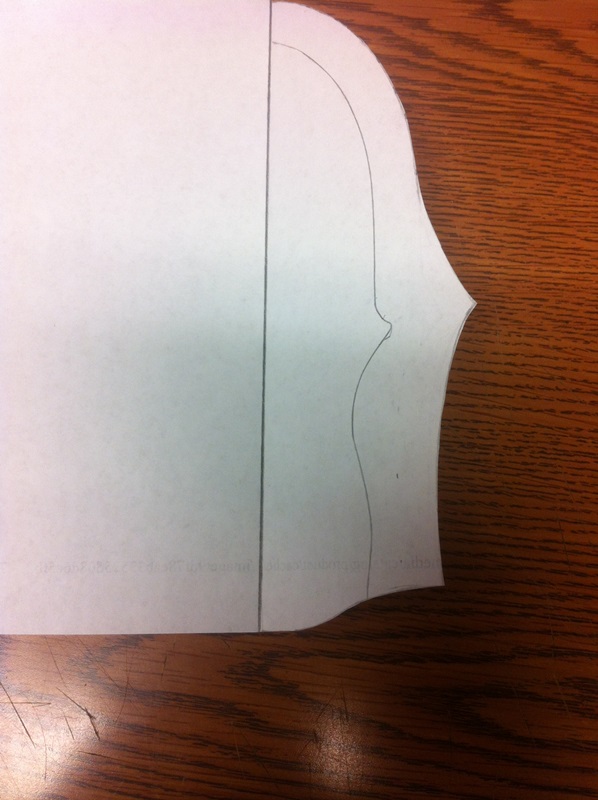
    now fold your paper in half on your line and when you first draw your line press hard with the pen or knife that way when you fold it its wants to follow that line. I draw a line down the edge of the folded paper this helps me keep it lined up while I cut along the folded edge.
    Click image for larger version

Name:	IMG_3300.JPG
Views:	1
Size:	119.2 KB
ID:	24317079
    heres you template to trace out on your leather.
    Click image for larger version

Name:	IMG_3301.JPG
Views:	1
Size:	133.8 KB
ID:	24317080

    Comment


      #17
      this is that line I mentioned earlier measure from the centerline to the wdiest point of the knife and put a couple dots at that width to the edge of your template connect the dots. if you follow the handle the knife will not fit.
      lay this on your leather trace it out and you can cut your line on your leather or cut it a little wide and bring it to the line with a belt sander your choice.
      Click image for larger version

Name:	IMG_3302.JPG
Views:	1
Size:	110.8 KB
ID:	24317081
      once you have trace that template, you will need to trim about a 1/4" off the end of the welt toward the tip of the knife see next picture. if you leave it long your sheath will be twisted and it also allows water to drain out if it gets dropped in the water or your in the rain.
      Click image for larger version

Name:	IMG_3303.JPG
Views:	1
Size:	115.0 KB
ID:	24317082
      this is the end you trim
      Click image for larger version

Name:	IMG_3304.JPG
Views:	1
Size:	181.3 KB
ID:	24317083

      now a few tips: got to harbor freight and get a pair of wing dividers these are great for putting a line around the entire sheath I use this since I don't have a groover for the stitching, I set it for 1/4" wide and go around the entire knife and I also use it to set my stitch spacing I leave it a 1/4" wide and start in the corner and walk it almost to the tip of the sheath.now you have nice even spacing on your stitches with a nice border line around the sheathi also use a swivel knife on the line I drew with the dividers this makes the line deeper I do it for the whole sheath, it also helps the stitching not sit so high. just mark the side that is going to be facing out on the sheath do this before you glue it up.

      don't forget to stitch your belt loop up before you glue it up, that's a pain in the butt I have done it several times.

      also before you glue it up get you one of those nylon edge slicker I think texas knife has them take a 1/4 bolt about 3" long and run it through the slicker and out a nut on top of it to lock it down now you can use it on your drill press, no the top edge of your sheath where the knife goes into it at use this tool to burnish this edge before you glue it up, it helps to have an edge beveler, bevel the edges first inside and out before you burnish. do not bevel the edges of the sheath that the stitching will be on you will be sanding this and you can use the sander to bevel them. now glue the welt in and close the sheath up. now you are ready to drill, don't use a drill bit go to walmart in the sewing section they have what is called doll needles I think it is they are big its a pack of 5 needles use the biggest needle to drill your holes, a drill tears leather this needle will punch a nice hole a burnish it at the same time. now stitch it up and if its not dyed dip in neats foot oil and hang to dry.

      this is the end result, my first ones were terrible, takes practice, take your time and think about everything otherwise you will forget to do something. it may help to draw out what you want to do on your pattern then copy it to your leather.
      Click image for larger version

Name:	IMG_7615.JPG
Views:	1
Size:	184.8 KB
ID:	24317085

      let me know if I can help, hope I haven't confused you.

      Comment


        #18
        Originally posted by bbs383ci View Post
        this is that line I mentioned earlier measure from the centerline to the wdiest point of the knife and put a couple dots at that width to the edge of your template connect the dots. if you follow the handle the knife will not fit.
        lay this on your leather trace it out and you can cut your line on your leather or cut it a little wide and bring it to the line with a belt sander your choice.
        [ATTACH]635538[/ATTACH]
        once you have trace that template, you will need to trim about a 1/4" off the end of the welt toward the tip of the knife see next picture. if you leave it long your sheath will be twisted and it also allows water to drain out if it gets dropped in the water or your in the rain.
        [ATTACH]635539[/ATTACH]
        this is the end you trim
        [ATTACH]635540[/ATTACH]

        now a few tips: got to harbor freight and get a pair of wing dividers these are great for putting a line around the entire sheath I use this since I don't have a groover for the stitching, I set it for 1/4" wide and go around the entire knife and I also use it to set my stitch spacing I leave it a 1/4" wide and start in the corner and walk it almost to the tip of the sheath.now you have nice even spacing on your stitches with a nice border line around the sheathi also use a swivel knife on the line I drew with the dividers this makes the line deeper I do it for the whole sheath, it also helps the stitching not sit so high. just mark the side that is going to be facing out on the sheath do this before you glue it up.

        don't forget to stitch your belt loop up before you glue it up, that's a pain in the butt I have done it several times.

        also before you glue it up get you one of those nylon edge slicker I think texas knife has them take a 1/4 bolt about 3" long and run it through the slicker and out a nut on top of it to lock it down now you can use it on your drill press, no the top edge of your sheath where the knife goes into it at use this tool to burnish this edge before you glue it up, it helps to have an edge beveler, bevel the edges first inside and out before you burnish. do not bevel the edges of the sheath that the stitching will be on you will be sanding this and you can use the sander to bevel them. now glue the welt in and close the sheath up. now you are ready to drill, don't use a drill bit go to walmart in the sewing section they have what is called doll needles I think it is they are big its a pack of 5 needles use the biggest needle to drill your holes, a drill tears leather this needle will punch a nice hole a burnish it at the same time. now stitch it up and if its not dyed dip in neats foot oil and hang to dry.

        this is the end result, my first ones were terrible, takes practice, take your time and think about everything otherwise you will forget to do something. it may help to draw out what you want to do on your pattern then copy it to your leather.
        [ATTACH]635542[/ATTACH]

        let me know if I can help, hope I haven't confused you.
        that's a great post, thanks for sharing.

        Comment


          #19
          more than welcome

          Comment


            #20
            That is an awesome little tutorial, bbs383ci. Thank you very much!

            Would you mind posting a picture of your wing dividers? I have no idea what that is. Also, what will it be near at Harbor Freight?

            Comment


              #21
              here ya go
              Attached Files

              Comment


                #22
                That's great stuff!

                D

                Comment


                  #23
                  Very nice

                  Comment


                    #24
                    Heck of a nice job on this.

                    Comment


                      #25
                      Just saw this for the first time. Great work OP. I really like the handle.

                      Comment

                      Working...
                      X