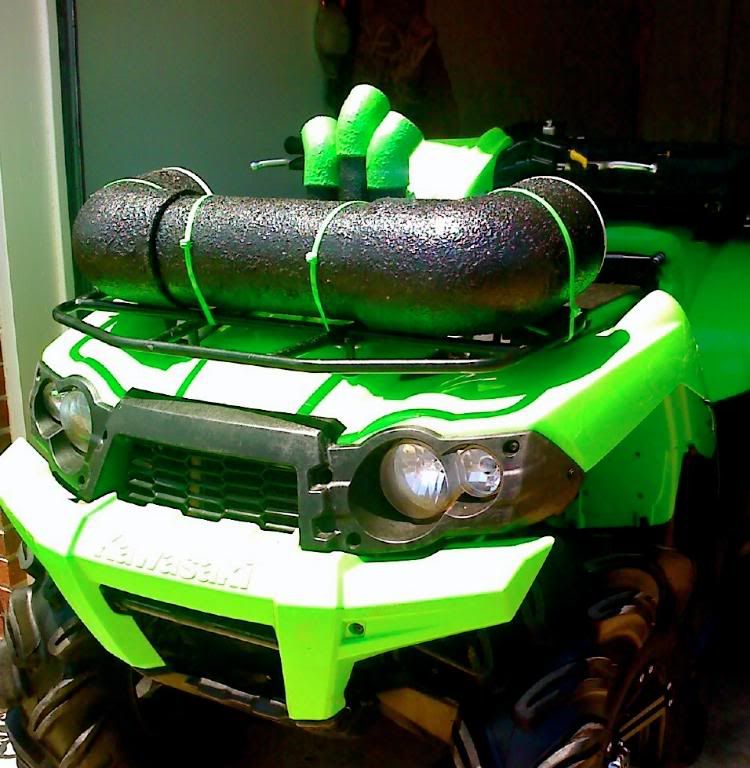
Here's basically a step by step. It's not perfect but it's kidna what I did. I built a split system, but this is for the normal system.
To build your own audiopipe about as much work will go into planning and choosing the system as much as building it. Depending on what you want and how much you want to spend, you have to make the choice of which components to purchase.
For the purpose of this article it will be assumed that you are going to make a 6” audiopipe system. This is the most common type, with readily available and moderately priced components. You can go with a 4” or 8” system, but the 4” system won’t give you enough sound for what you probably want, and the 8” system will take a lot of power to run, and it’s going to be hard to find parts.
Speakers:
You need to find a waterproof speaker. These are usually sold as a “marine” type of speaker. There are many companies that make them including Bazooka, Boss, Boze, Clarion, Sony, and far too many to name. You will need a 6.5” round speaker. This is very much a case of you get what you pay for so decide how much sound quality is worth to you. Bazookas are possibly the most common, with Boss being another very common speaker. Off of EBay you can very possibly get Bazooka speakers for around 70 dollars a set, shipped.
Amp:
The most difficult part of finding an amp is finding one which will fit inside a 6” PVC pipe. One type which does fit is the Boss Chaos150, which is a 200W amp. It’s long and skinny and will fit inside the pipe. This amp can usually be found off of EBay for under 50 dollars. There are many other options out there, but just make sure it will fit. Small amps like this are often sold as motorcycle amps, so that’s something to search for.
Enclosure:
This is another area that is all about what you want. Your ATV might have different accessories, snorkels, radiator, cargo box, or whatever on the front so you have to decide what will fit.
2-6” PVC elbows
18”-36” of 6”PVC pipe. There are some different types of 6” pipe so make sure the pipe fits the fittings. The length you need will depend completely on the configuration you make your pipe.
Wire:
Decide how you want to wire your audiopipe. You will need the following wire:
3’ of 14 or 16 gauge speaker wire.
A 1/8” stereo to dual RCA cord.
A 4” piece of wire, blue if possible though it doesn’t really matter.
Power wire. Decide how you want to wire your system. If you want to power it through the cigarette lighter I would recommend buying a pre-made 12V extension cord that can be found at a Wal-Mart or similar store. You can cut the female (socket) end off of it and wire it straight to the amp.
Assembly:
The first thing to do is prepare the tube for assembly. Cut two 2” sections of your 6” pipe. Be very careful that at least one side is pretty much perfectly straight. Glue these in one end of each of the elbows with the straight side perfectly flush with the end of the pipe. After letting the glue dry, take one of the speakers and place it over the end with the glued in piece of pipe. Make sure it is perfectly centered then take a punch and mark the holes. You can also hold it in place and drill a small pilot hole. There’s not a lot of extra room so if the speaker gets off centered you might not good fastening with all 4 screws. Once the holes are pilot drilled, use an appropriately sized drill to drill the full hole. Do this on each elbow.
Cut a section of pipe for the center of the tube, between the elbows. This length can be whatever you want it to be to fit your application. The only requirement is that it needs to be long enough to enclose your amp. The next step will be making some way to attach the amp to the inside of the pipe. A common and relatively easy method is to use a piece of 2x4 and sand the corners so it will fit smoothly inside the pipe while still fastening to the amp. A couple of screws from the outside of the pipe into the wood works well. A tricky part of fitting it inside the pipe might be the RCA connectors, so make sure you put these on the amp before you fasten the amp down. Screw the amp down to the wood, then slide everything inside the pipe, the put two screws through to hold the assembly in the pipe. Make sure to not put the screws too close to the ends or the elbows won’t slide on.
You will have to drill a hole for the wires to go in. Use a spade bit for wood to drill this hole. A normal steel twist bit will often catch and crack the PVC unless you are very, very careful.
Final Assembly and Wiring:
Remove the amp from the assembly. You will need it out of the pipe to hook up the wires. Push the power wire and stereo wire through the hole in the pipe. Plug the RCA plugs into the amp. Strip about ¼”- ½” off the end of the power wires. Fasten the ends to the appropriate terminals on the amp (positive to +, negative to -). Take the 4” wire and strip the ends. Attach one to the “remote” terminal on the amp and the other to the positive/+ terminal on the amp, the same terminal that the power cord is hooked to.
Take the speaker wire and strip the ends. Attach one end to the speaker connection on the amp. Be careful to get both speakers wired the same (positive to positive, negative to negative) If you get one wired differently than the other they will cancel each other out and reduce the volume greatly.
Now that all the wires on the amp are hooked up, put the amp back into the tube and fasten it down. Before tightening the screws, put some silicone around the screws to seal it.
Slide the elbows on the center pipe. Align them how you’d like, and put a screw to hold them in. You could glue them together, but in the event that you would need to replace a fuse or work on it in the future, it would be very difficult to take apart. For better sealing, put a thin layer of dielectric grease around the pipe before sliding on the elbow. This will help prevent water from getting inside, though it’s probably not needed.
Once the tube is assembled, you should have a speaker wire coming out each end, and the power wire and stereo wire coming out of a hole in the center. Hook up the speaker wires and faster the speakers down using screws. A thin layer of silicone RTV will help seal the speakers, but good marine speakers should have a gasket supplied with them which will seal it well enough.
Apply lots of silicone around the hole where the power wire is coming out of. Allow everything to dry.
You can paint or finish off the pipe any way you choose. The more popular method is to use rubber undercoating which can be found in most hardware or auto parts stores. Remember to tape off and cover the speakers well before painting them. The coating is heavy and if the speaker cones were painted with it it would affect the performance.
Your audiopipe should now be ready to plug in, hook up your MP3 player, and rock on.
not my bike but this is what the how-to explains to build...they are really cool!!
To build your own audiopipe about as much work will go into planning and choosing the system as much as building it. Depending on what you want and how much you want to spend, you have to make the choice of which components to purchase.
For the purpose of this article it will be assumed that you are going to make a 6” audiopipe system. This is the most common type, with readily available and moderately priced components. You can go with a 4” or 8” system, but the 4” system won’t give you enough sound for what you probably want, and the 8” system will take a lot of power to run, and it’s going to be hard to find parts.
Speakers:
You need to find a waterproof speaker. These are usually sold as a “marine” type of speaker. There are many companies that make them including Bazooka, Boss, Boze, Clarion, Sony, and far too many to name. You will need a 6.5” round speaker. This is very much a case of you get what you pay for so decide how much sound quality is worth to you. Bazookas are possibly the most common, with Boss being another very common speaker. Off of EBay you can very possibly get Bazooka speakers for around 70 dollars a set, shipped.
Amp:
The most difficult part of finding an amp is finding one which will fit inside a 6” PVC pipe. One type which does fit is the Boss Chaos150, which is a 200W amp. It’s long and skinny and will fit inside the pipe. This amp can usually be found off of EBay for under 50 dollars. There are many other options out there, but just make sure it will fit. Small amps like this are often sold as motorcycle amps, so that’s something to search for.
Enclosure:
This is another area that is all about what you want. Your ATV might have different accessories, snorkels, radiator, cargo box, or whatever on the front so you have to decide what will fit.
2-6” PVC elbows
18”-36” of 6”PVC pipe. There are some different types of 6” pipe so make sure the pipe fits the fittings. The length you need will depend completely on the configuration you make your pipe.
Wire:
Decide how you want to wire your audiopipe. You will need the following wire:
3’ of 14 or 16 gauge speaker wire.
A 1/8” stereo to dual RCA cord.
A 4” piece of wire, blue if possible though it doesn’t really matter.
Power wire. Decide how you want to wire your system. If you want to power it through the cigarette lighter I would recommend buying a pre-made 12V extension cord that can be found at a Wal-Mart or similar store. You can cut the female (socket) end off of it and wire it straight to the amp.
Assembly:
The first thing to do is prepare the tube for assembly. Cut two 2” sections of your 6” pipe. Be very careful that at least one side is pretty much perfectly straight. Glue these in one end of each of the elbows with the straight side perfectly flush with the end of the pipe. After letting the glue dry, take one of the speakers and place it over the end with the glued in piece of pipe. Make sure it is perfectly centered then take a punch and mark the holes. You can also hold it in place and drill a small pilot hole. There’s not a lot of extra room so if the speaker gets off centered you might not good fastening with all 4 screws. Once the holes are pilot drilled, use an appropriately sized drill to drill the full hole. Do this on each elbow.
Cut a section of pipe for the center of the tube, between the elbows. This length can be whatever you want it to be to fit your application. The only requirement is that it needs to be long enough to enclose your amp. The next step will be making some way to attach the amp to the inside of the pipe. A common and relatively easy method is to use a piece of 2x4 and sand the corners so it will fit smoothly inside the pipe while still fastening to the amp. A couple of screws from the outside of the pipe into the wood works well. A tricky part of fitting it inside the pipe might be the RCA connectors, so make sure you put these on the amp before you fasten the amp down. Screw the amp down to the wood, then slide everything inside the pipe, the put two screws through to hold the assembly in the pipe. Make sure to not put the screws too close to the ends or the elbows won’t slide on.
You will have to drill a hole for the wires to go in. Use a spade bit for wood to drill this hole. A normal steel twist bit will often catch and crack the PVC unless you are very, very careful.
Final Assembly and Wiring:
Remove the amp from the assembly. You will need it out of the pipe to hook up the wires. Push the power wire and stereo wire through the hole in the pipe. Plug the RCA plugs into the amp. Strip about ¼”- ½” off the end of the power wires. Fasten the ends to the appropriate terminals on the amp (positive to +, negative to -). Take the 4” wire and strip the ends. Attach one to the “remote” terminal on the amp and the other to the positive/+ terminal on the amp, the same terminal that the power cord is hooked to.
Take the speaker wire and strip the ends. Attach one end to the speaker connection on the amp. Be careful to get both speakers wired the same (positive to positive, negative to negative) If you get one wired differently than the other they will cancel each other out and reduce the volume greatly.
Now that all the wires on the amp are hooked up, put the amp back into the tube and fasten it down. Before tightening the screws, put some silicone around the screws to seal it.
Slide the elbows on the center pipe. Align them how you’d like, and put a screw to hold them in. You could glue them together, but in the event that you would need to replace a fuse or work on it in the future, it would be very difficult to take apart. For better sealing, put a thin layer of dielectric grease around the pipe before sliding on the elbow. This will help prevent water from getting inside, though it’s probably not needed.
Once the tube is assembled, you should have a speaker wire coming out each end, and the power wire and stereo wire coming out of a hole in the center. Hook up the speaker wires and faster the speakers down using screws. A thin layer of silicone RTV will help seal the speakers, but good marine speakers should have a gasket supplied with them which will seal it well enough.
Apply lots of silicone around the hole where the power wire is coming out of. Allow everything to dry.
You can paint or finish off the pipe any way you choose. The more popular method is to use rubber undercoating which can be found in most hardware or auto parts stores. Remember to tape off and cover the speakers well before painting them. The coating is heavy and if the speaker cones were painted with it it would affect the performance.
Your audiopipe should now be ready to plug in, hook up your MP3 player, and rock on.
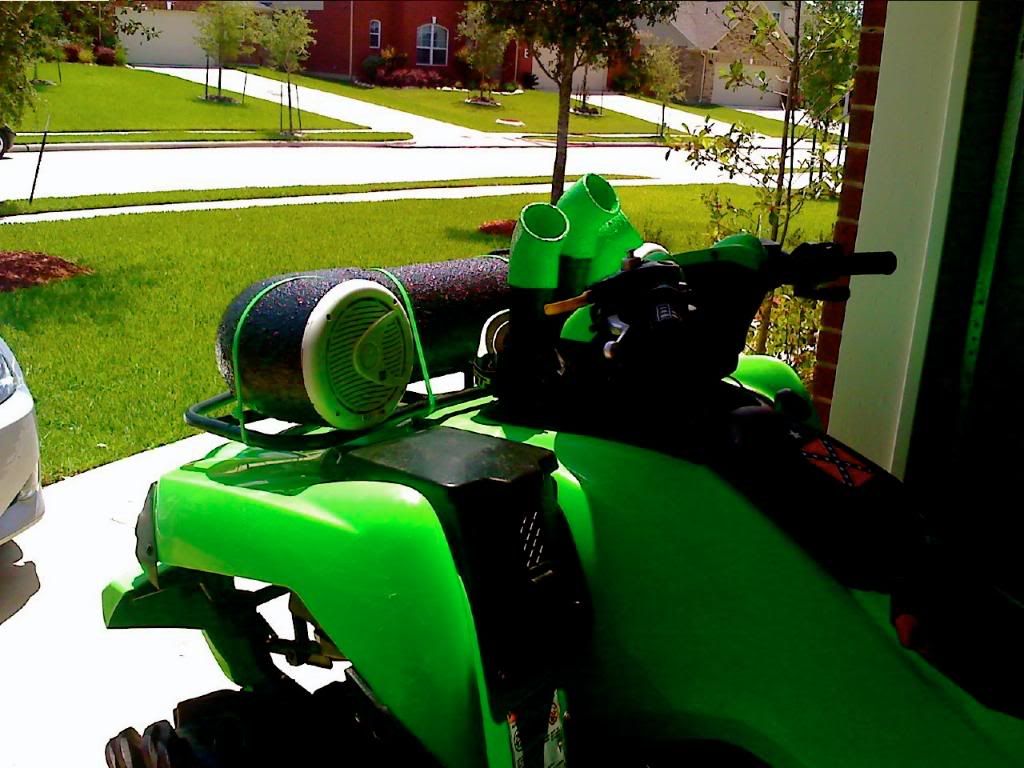
not my bike but this is what the how-to explains to build...they are really cool!!


Comment