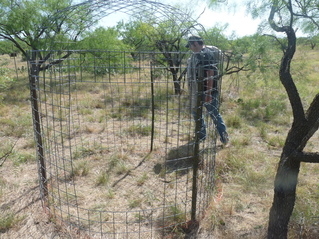
So I had this design idea for a blind a while ago and have been brainstorming it, and tweaking it, and saving/hunting for supplies, since the end of last season. I had a hard time explaining the shell to the boys at the ranch, but God bless them, they finally decided to just trust me and help me build these things. Each blind has 4 or 5 - 5' t-posts, 1 - 5'x20' utility panel, and 2 or 3 strips of scrap utility panel to form the domed roof.
We took strips and pieces of old bed sheets and table cloths I talked my friends and family out of and completely submerged them into a five gallon bucket of latex paint I had been gathering and saving since I dreamed this idea up. Got the material saturated in the paint and then started laying it over the "skeleton" of the blind. Kind of like Paper Mache.


As the paint dries, it shrinks up around the frame and gives it a hard shell. For this to work right, we used just regular latex paint and LOTS of it. I mean, those peices of material have to be totally saturated. It is very messy. The good news is, nothing is needed to hold the material in place except the paint. It just sticks to itself. Look at the sides of the shooting window in the inside view pic below. When the material was wet, we just smoothed it around the wall and let it dry.

Next was the brushing in. Just poked some holes in the dried "skin" of the blind and insterted a bunch of zip ties. Held the brush on nicely and if/when we need to repaint or make repairs to the blinds over the seasons, just clip the zip tie and re-install a new one with a fresh piece of brush.

I didn't plan the color of the paint to be so light, but I really like how it turned out. In fact, when I was bumming old paint from anyone that had it, or home depot and walmart, I was always asking for mis-tints. I told everyone, "I'll take whatever you can spare. I don't care about the color."
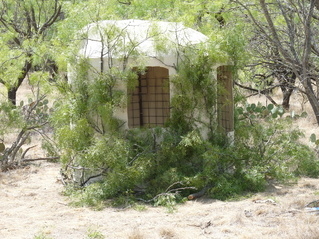
We probably would have spent more time camoflaging the paintjob with accent colors but we were doing all this work in the middle of the day July 4th weekend and it was freakin' hot! The next two pics show the blinds more or less finished. At least, these are the last pics taken of the blinds. Since these two were taken, the insides of the blinds have been spraypainted black and a heavy black cloth door was installed so we don't silhouette. Some extra brushing has been done, but not too much. Just to fill in some of the holes where the green from the Mesquite dried up. I didn't want to lose the effect of the light colored background. We are debating rigging some kind of shoot through mesh, but we'll see. Killed one doe out of one of these already, but sadly I have only been hunting one weekend this season. It sucks, I have spent more time building these darnthing than I have spent hunting in them. Anyway, thanks for reading.

BTW the total cost for me to build both of these was $8.00 or so worth of zip ties. ALL of the material was stuff I had or was given. Panels, paint, etc. was scrap or given so I don't know what it would have cost to build with new material. Panels would have been $30 to $50. Mis-tint paint at wally world, the depot, or sherwin williams was quoted at $5-8 /gal. FYI.
We took strips and pieces of old bed sheets and table cloths I talked my friends and family out of and completely submerged them into a five gallon bucket of latex paint I had been gathering and saving since I dreamed this idea up. Got the material saturated in the paint and then started laying it over the "skeleton" of the blind. Kind of like Paper Mache.
As the paint dries, it shrinks up around the frame and gives it a hard shell. For this to work right, we used just regular latex paint and LOTS of it. I mean, those peices of material have to be totally saturated. It is very messy. The good news is, nothing is needed to hold the material in place except the paint. It just sticks to itself. Look at the sides of the shooting window in the inside view pic below. When the material was wet, we just smoothed it around the wall and let it dry.
Next was the brushing in. Just poked some holes in the dried "skin" of the blind and insterted a bunch of zip ties. Held the brush on nicely and if/when we need to repaint or make repairs to the blinds over the seasons, just clip the zip tie and re-install a new one with a fresh piece of brush.
I didn't plan the color of the paint to be so light, but I really like how it turned out. In fact, when I was bumming old paint from anyone that had it, or home depot and walmart, I was always asking for mis-tints. I told everyone, "I'll take whatever you can spare. I don't care about the color."
We probably would have spent more time camoflaging the paintjob with accent colors but we were doing all this work in the middle of the day July 4th weekend and it was freakin' hot! The next two pics show the blinds more or less finished. At least, these are the last pics taken of the blinds. Since these two were taken, the insides of the blinds have been spraypainted black and a heavy black cloth door was installed so we don't silhouette. Some extra brushing has been done, but not too much. Just to fill in some of the holes where the green from the Mesquite dried up. I didn't want to lose the effect of the light colored background. We are debating rigging some kind of shoot through mesh, but we'll see. Killed one doe out of one of these already, but sadly I have only been hunting one weekend this season. It sucks, I have spent more time building these darnthing than I have spent hunting in them. Anyway, thanks for reading.
BTW the total cost for me to build both of these was $8.00 or so worth of zip ties. ALL of the material was stuff I had or was given. Panels, paint, etc. was scrap or given so I don't know what it would have cost to build with new material. Panels would have been $30 to $50. Mis-tint paint at wally world, the depot, or sherwin williams was quoted at $5-8 /gal. FYI.

Comment